
A guide for landlords
How to List Your Property on Verv
Every screen of the listing flow, in order, with the fields explained and the buttons pointed out. Follow it start to finish and your property is live and taking enquiries.
Before you start
What you will need
The listing flow is eight steps, then a preview, a plan and a checkout. Nothing is charged until you publish, and every step saves as you go — you can stop half way and pick it up later from your Properties page.
The listing flow lives here
https://verv.co.uk/landlord/listing/addOpen it in a second tab and follow along screen by screen. You will be asked to sign in first — the flow is only reachable from a landlord account.
- The address
- Including the postcode and house number. You can also drop a pin on the map instead.
- Bedrooms and bathrooms
- Bedrooms means separate, lockable rooms only. Bathrooms includes en-suites and WCs.
- Your rent and deposit
- A monthly rent figure and which deposit policy you want to hold. Verv can suggest a rent if you are unsure.
- Earliest move-in date
- The first date a tenant could take occupancy.
- Photos of every room
- JPG or PNG, up to 5 MB each, up to ten photos. Landscape, shot in daylight.
- Your EPC position
- Either your rating (and optionally the certificate number and expiry), or ask Verv to arrange an assessor, or declare the property exempt.
The eight steps
- 1Listing details
Property type, bedrooms, bathrooms, size and furnishing.
- 2Location
The address, and the pin tenants see on map view.
- 3Features & preferencesOptional
What the property offers and who you will rent to.
- 4Tenancy details
Rent, deposit policy, minimum tenancy and move-in date.
- 5Description
The write-up tenants read once they have shortlisted you.
- 6Photos
Up to ten. Your cover photo does most of the work.
- 7Viewing availabilityOptional
The days and time slots tenants can self-book.
- 8Compliance
Your EPC declaration.
Two of the eight steps — Features & preferences and Viewing availability — are optional and can be skipped, but listings with features set attract noticeably more enquiries.
Getting started
Choose how to let the property
From your dashboard, click Add Listing. The first screen asks how you want to let the property. This sets up the rest of the flow, and you can change it later.
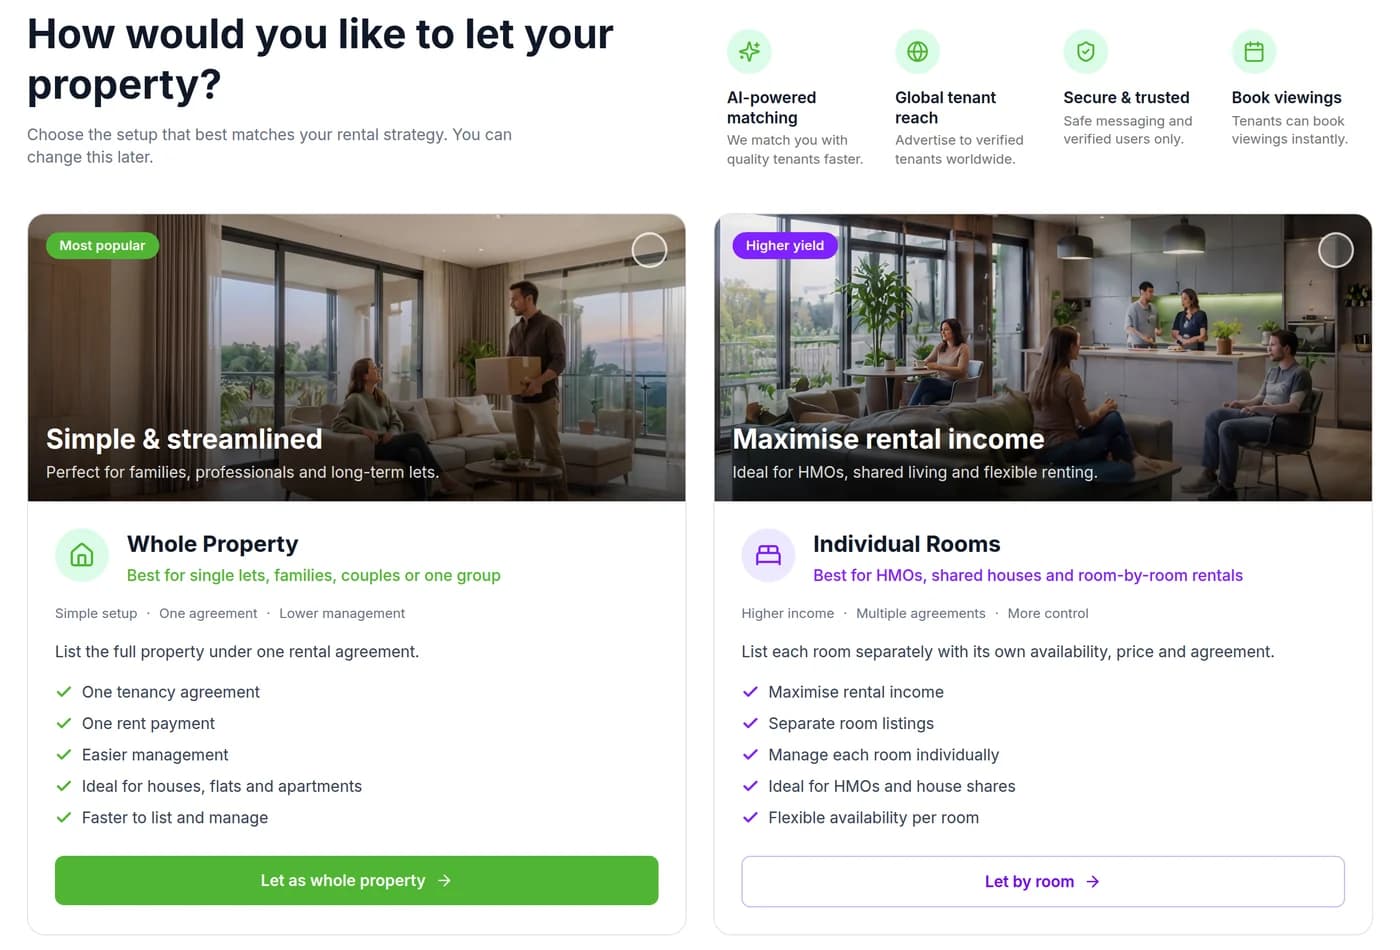
- 1Whole Property — the full property on one tenancy agreement, one rent payment. Use this for flats, houses and apartments let to a single household or group.
- 2Individual Rooms — each room gets its own listing, price and availability. Use this for HMOs and house shares.
- 3Click the button on the option you want. You can change this later.
Step 1 of 8
Listing details
The fundamentals tenants filter on before anything else, so accuracy here drives every enquiry that follows.
Required: property type, bedrooms, bathrooms, furnishing. Optional: size in square metres.
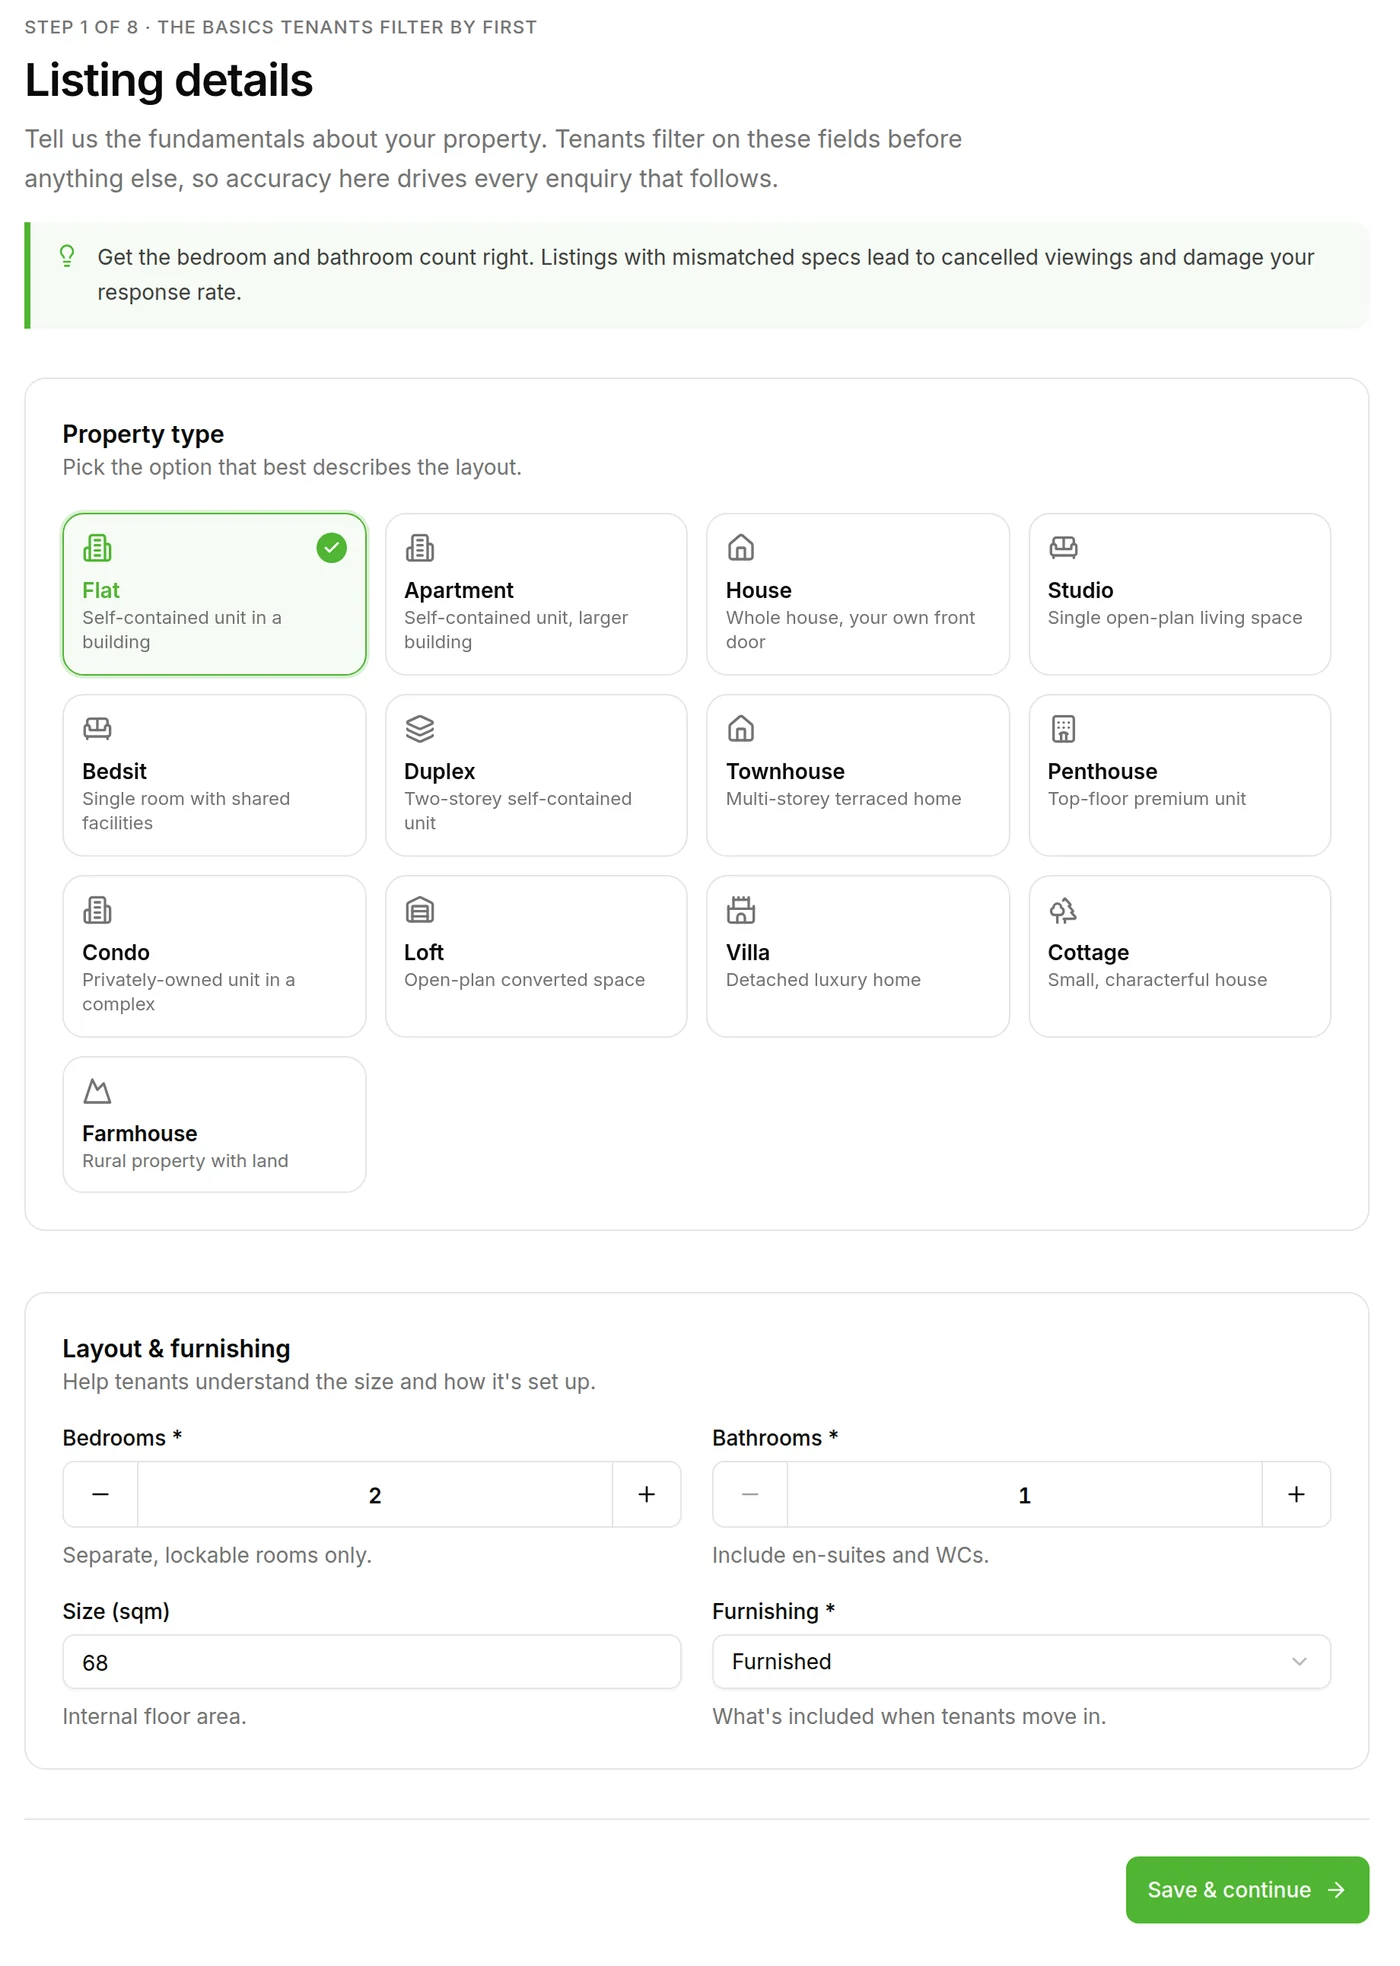
- 1Property type. Pick the one option that matches the layout. The tile turns green with a tick when it is selected.
- 2Layout & furnishing. Bedrooms, Bathrooms and Furnishing are required. Size (sqm) is optional. Bedrooms means separate lockable rooms only; bathrooms includes en-suites and WCs.
- 3Save & continue saves this step and moves you to the next one.
Verv’s tip on this screen
“Get the bedroom and bathroom count right. Listings with mismatched specs lead to cancelled viewings and damage your response rate.”
Step 2 of 8
Location
Where the property is. Verv uses these coordinates to surface your listing in nearby searches and on map view.
Required: country, city, postcode, house number, address, area / neighbourhood. Optional: address line 2. Tenants see only the area and city until they enquire.
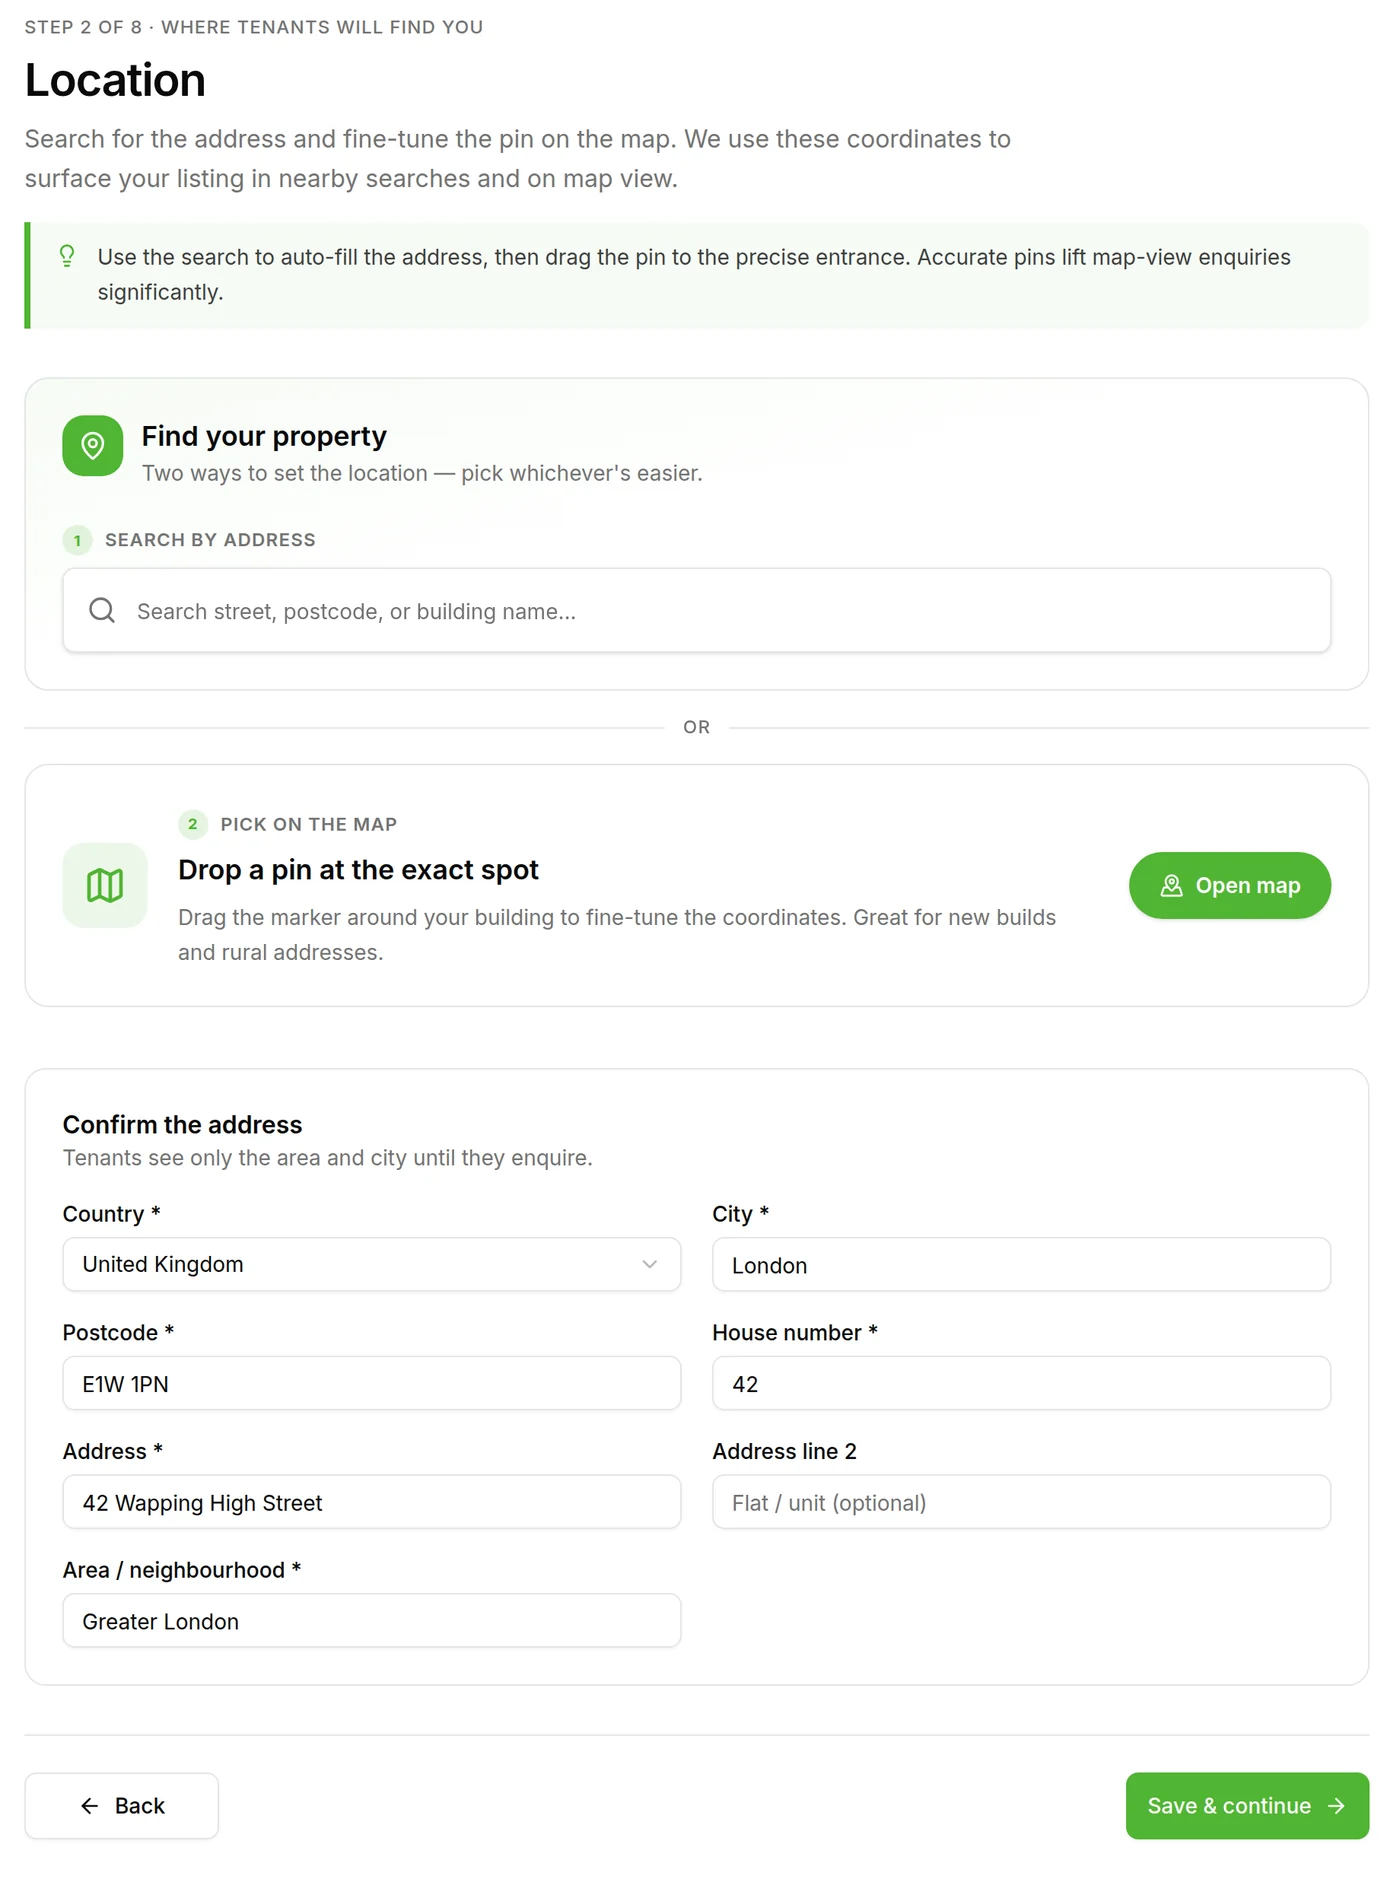
- 1Search by address. Start typing the street, postcode or building name and choose your address from the list — the fields at the bottom fill in for you.
- 2Or pick on the map. Open map lets you drag a pin onto the exact building. Useful for new builds and rural addresses.
- 3Confirm the address. Country, City, Postcode, House number, Address and Area / neighbourhood are required. Address line 2 is optional. Tenants only see the area and city until they enquire.
- 4Save & continue.
Verv’s tip on this screen
“Use the search to auto-fill the address, then drag the pin to the precise entrance. Accurate pins lift map-view enquiries significantly.”
Step 3 of 8
Features & preferences
OptionalWhat the property offers, and the kind of tenant you want to hear from.
This whole step is optional — but every feature you tick is one more tenant search your listing can appear in.
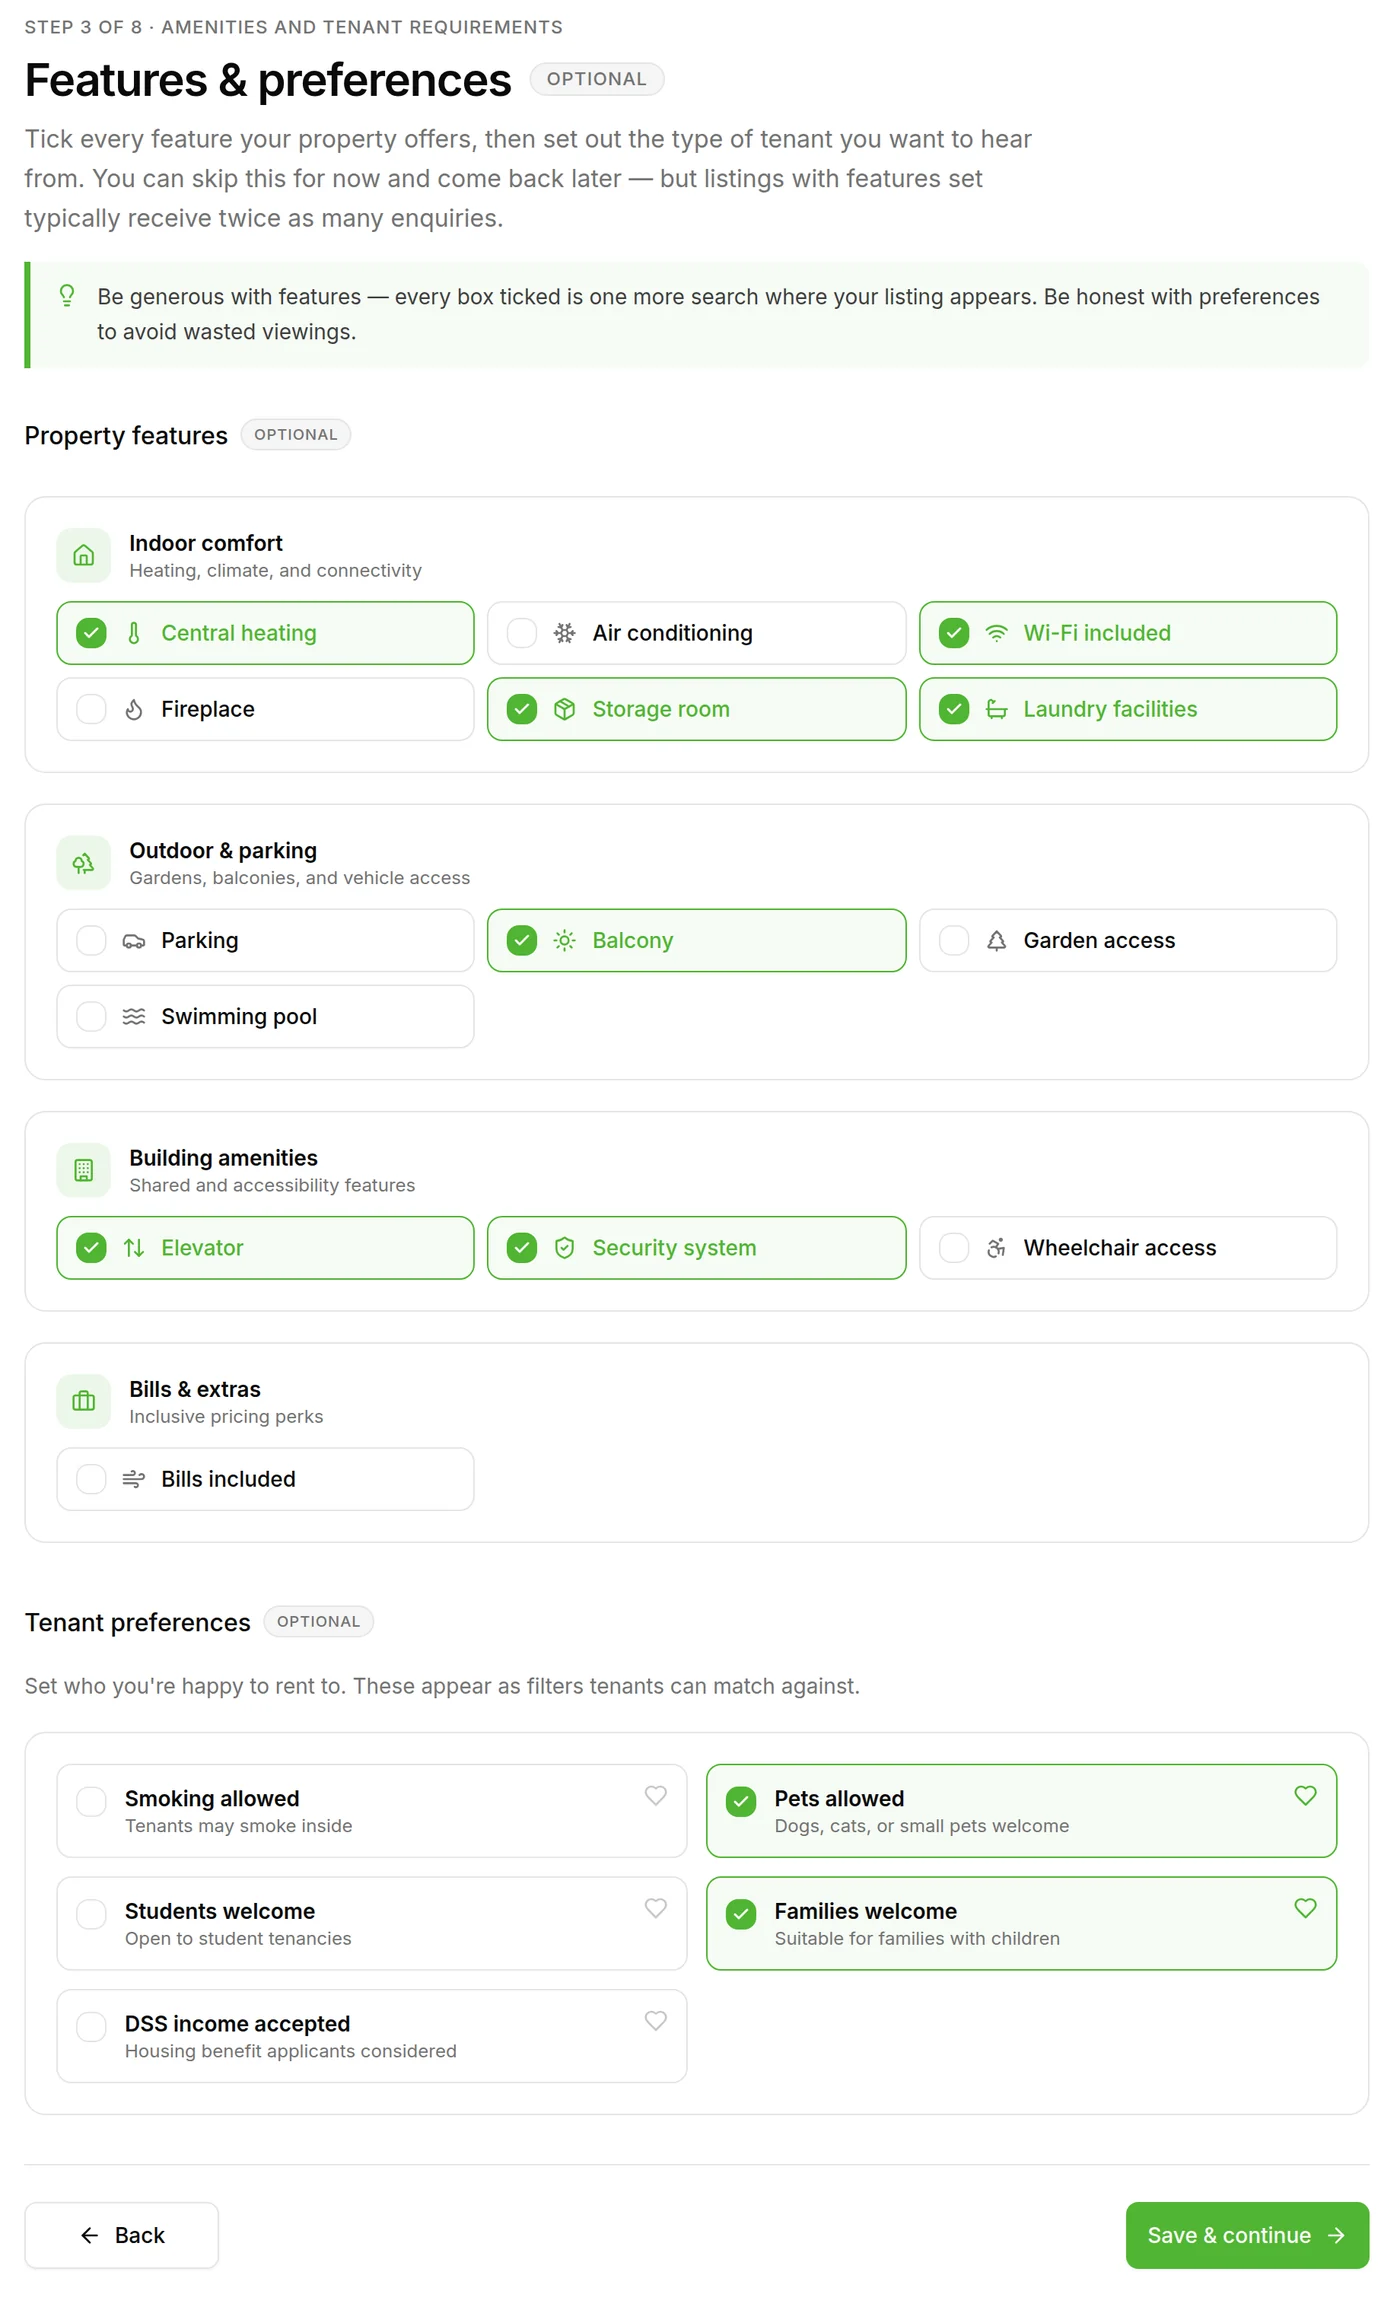
- 1Property features. Tick everything the property actually has, grouped into Indoor comfort, Outdoor & parking, Building amenities and Bills & extras. Each ticked box is one more tenant search your listing appears in.
- 2Tenant preferences. Smoking, students, pets, families and DSS. These show up as filters tenants can match against, so answer them honestly.
- 3This whole step is marked OPTIONAL — you can Save & continue without ticking anything and come back to it later.
Verv’s tip on this screen
“Be generous with features — every box ticked is one more search where your listing appears. Be honest with preferences to avoid wasted viewings.”
Step 4 of 8
Tenancy details
The financial terms. Tenants compare these side by side against similar properties, so pitch them realistically.
Required: monthly rent, deposit policy, earliest move-in date. Optional: minimum tenancy in months.
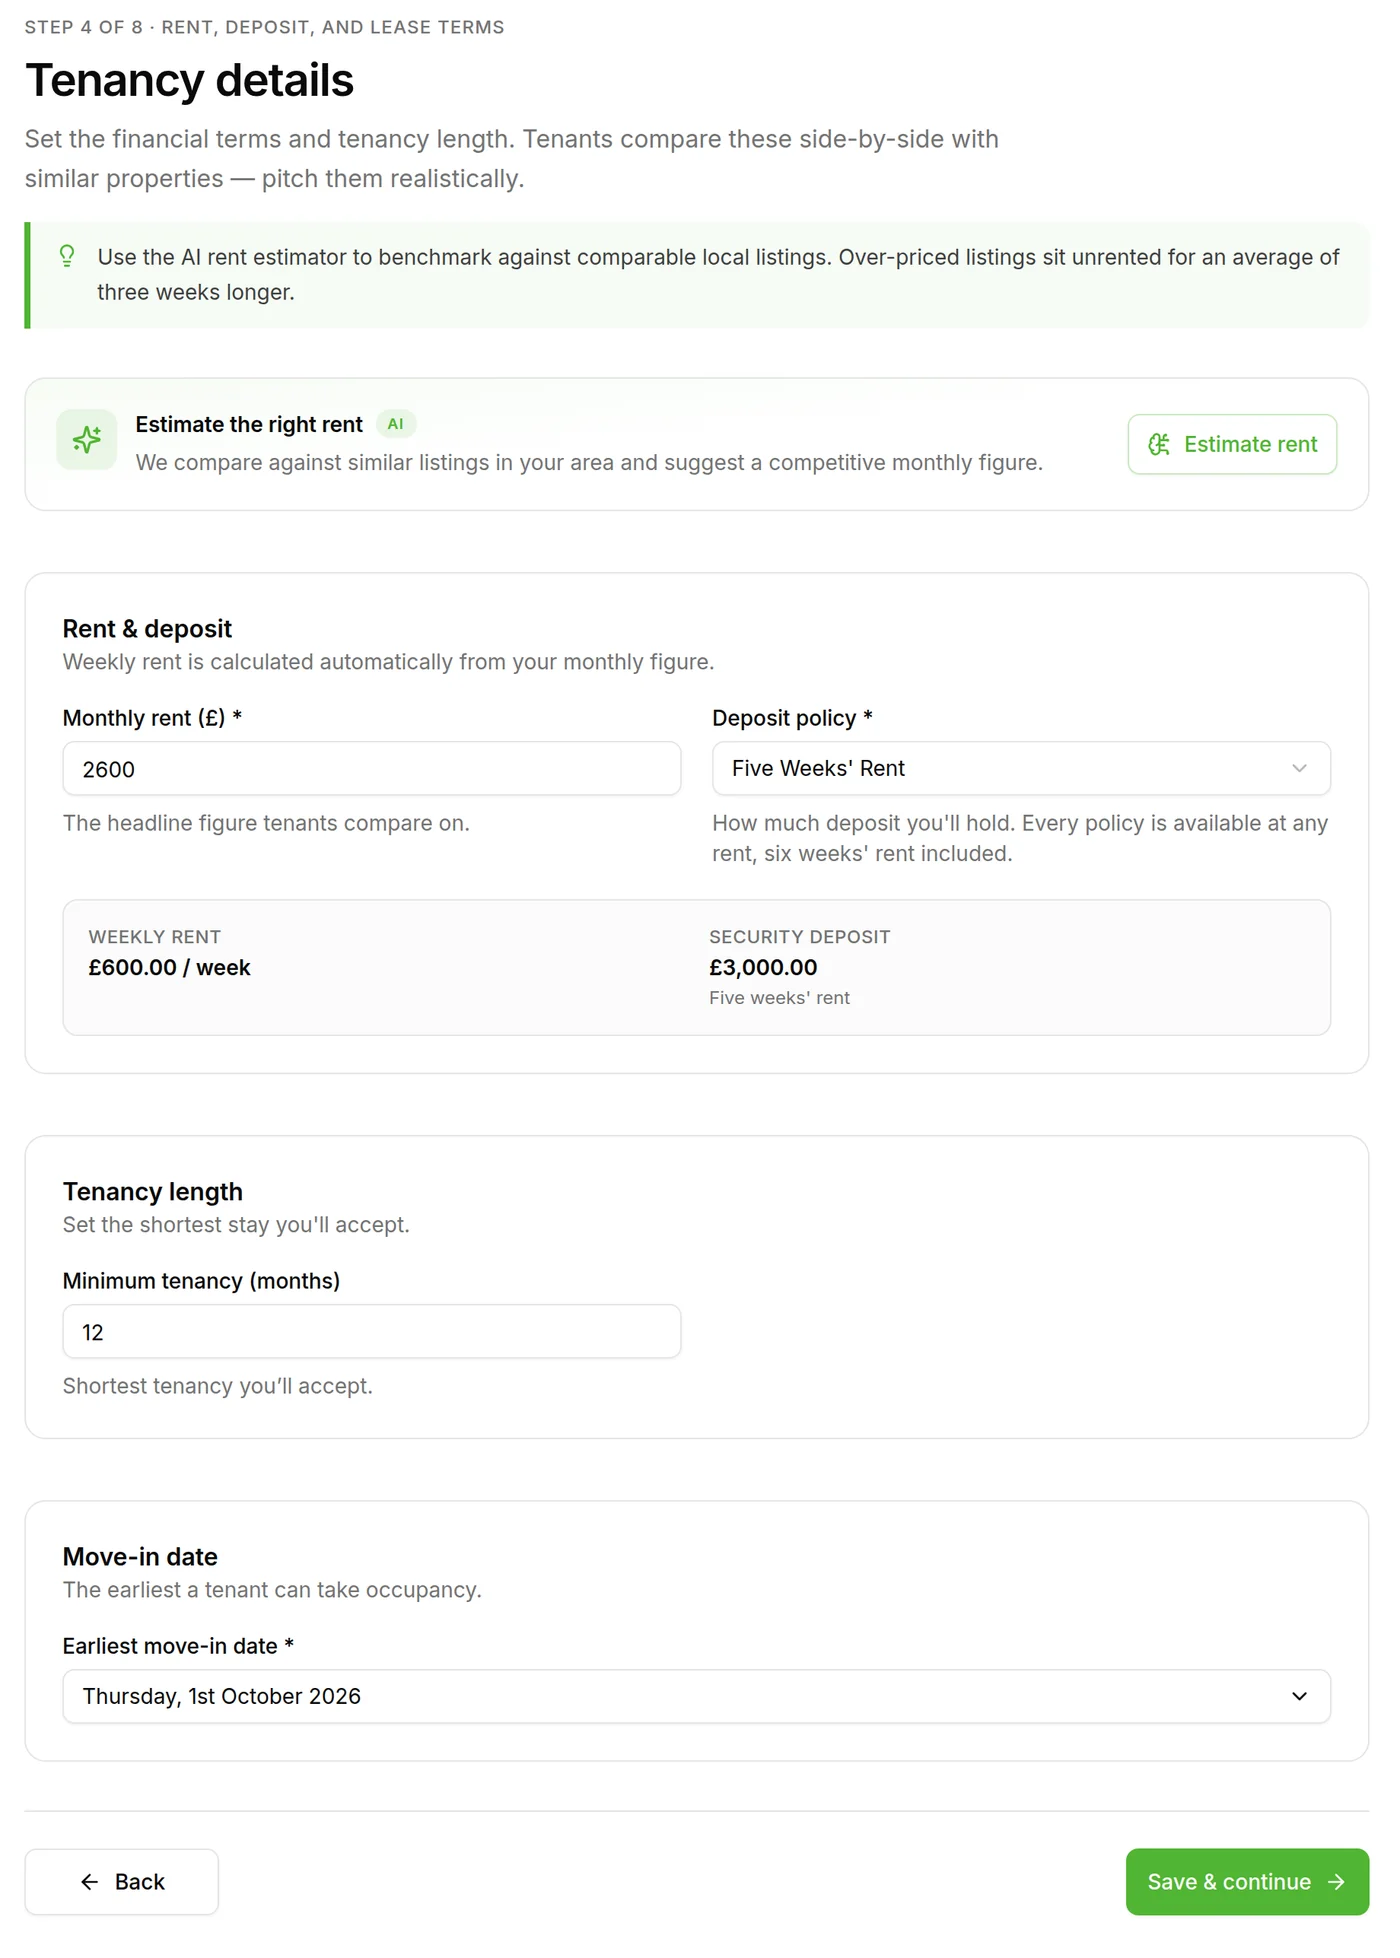
- 1Estimate rent compares your property against similar listings in the area and suggests a monthly figure. It is a suggestion — you can type your own.
- 2Monthly rent (£) is required. The weekly figure underneath is worked out for you automatically.
- 3Deposit policy is required. Every policy is available at any rent; the cash amount is shown underneath.
- 4Minimum tenancy (months) — the shortest stay you will accept.
- 5Earliest move-in date is required — the first date a tenant can take occupancy.
- 6Save & continue.
Verv’s tip on this screen
“Use the AI rent estimator to benchmark against comparable local listings. Over-priced listings sit unrented for an average of three weeks longer.”
Step 5 of 8
Description
The story your photos cannot tell — the neighbourhood, the light, the nearest station.
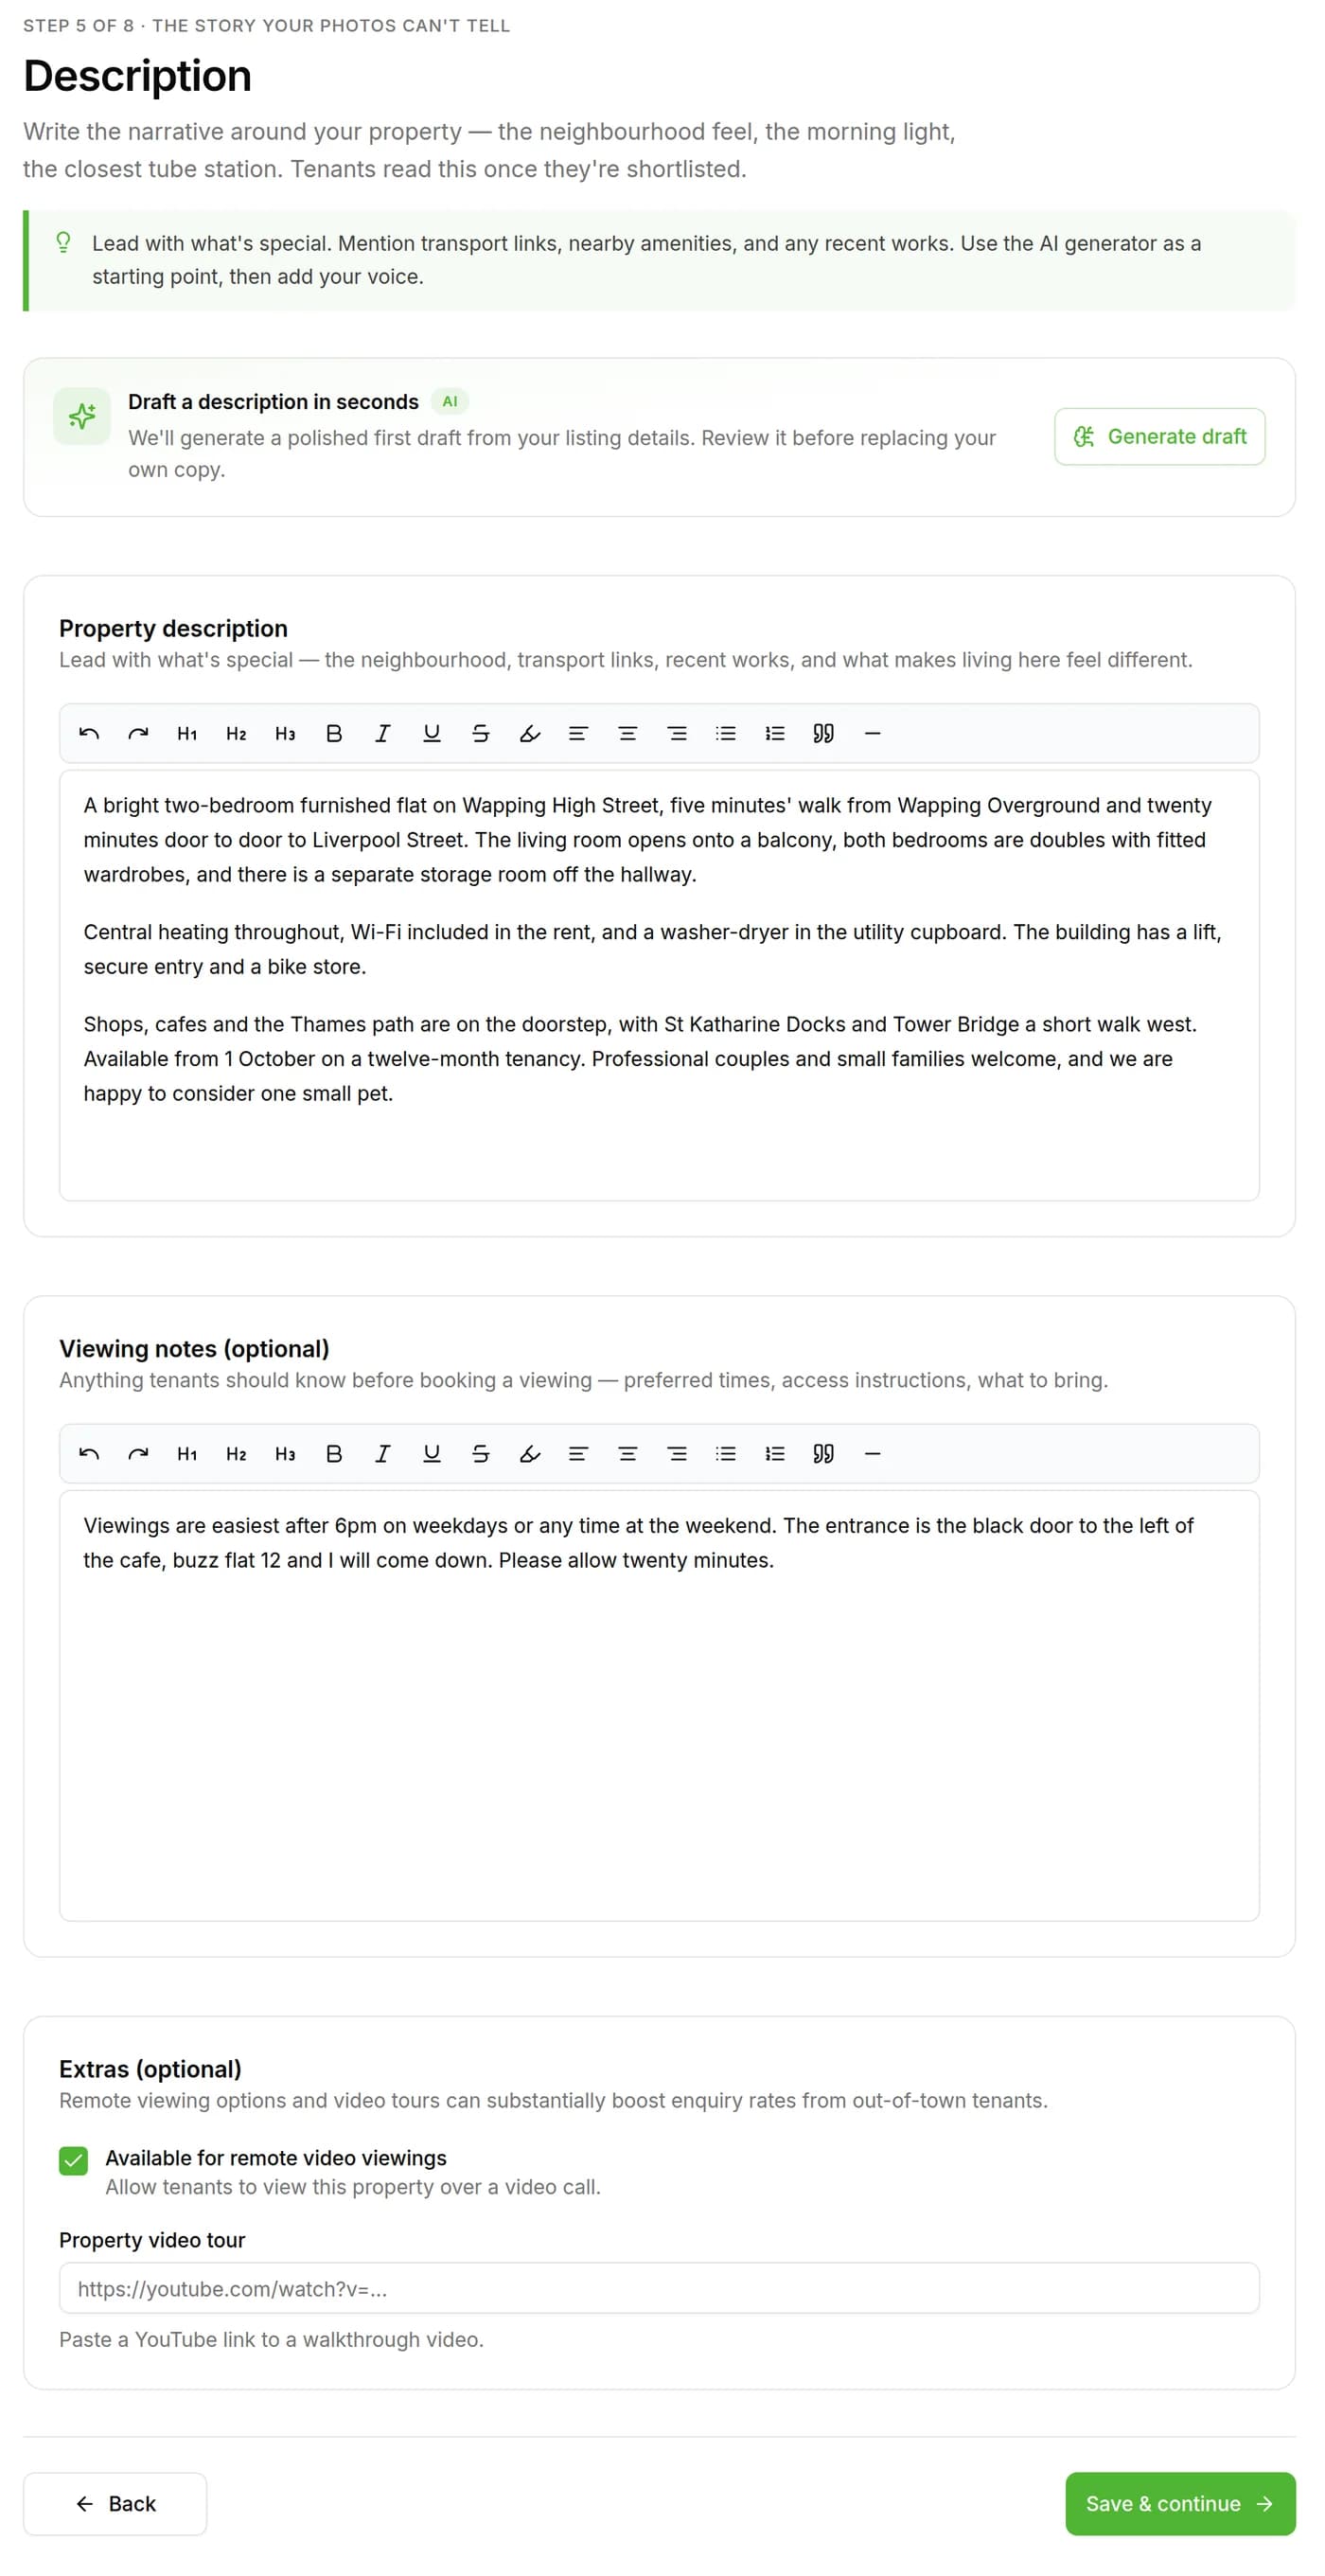
- 1Generate draft writes a first description from the details you have already entered. Read it, then edit it in your own words before saving.
- 2Property description. The main write-up tenants read once they have shortlisted you. Lead with transport links, recent works and what makes the place different.
- 3Viewing notes (optional) — preferred times, which door to use, the buzzer number, where to park.
- 4Extras (optional) — tick Available for remote video viewings, and paste a YouTube link if you have a walkthrough video.
- 5Save & continue.
Verv’s tip on this screen
“Lead with what's special. Mention transport links, nearby amenities, and any recent works. Use the AI generator as a starting point, then add your voice.”
Step 6 of 8
Photos
The first thing tenants see. Your cover photo is the single biggest factor in whether they click through from search results.
JPG or PNG, up to 5 MB each, up to ten photos. Shoot in daylight, tidy each room, pull back to show scale, and lead with the brightest space.
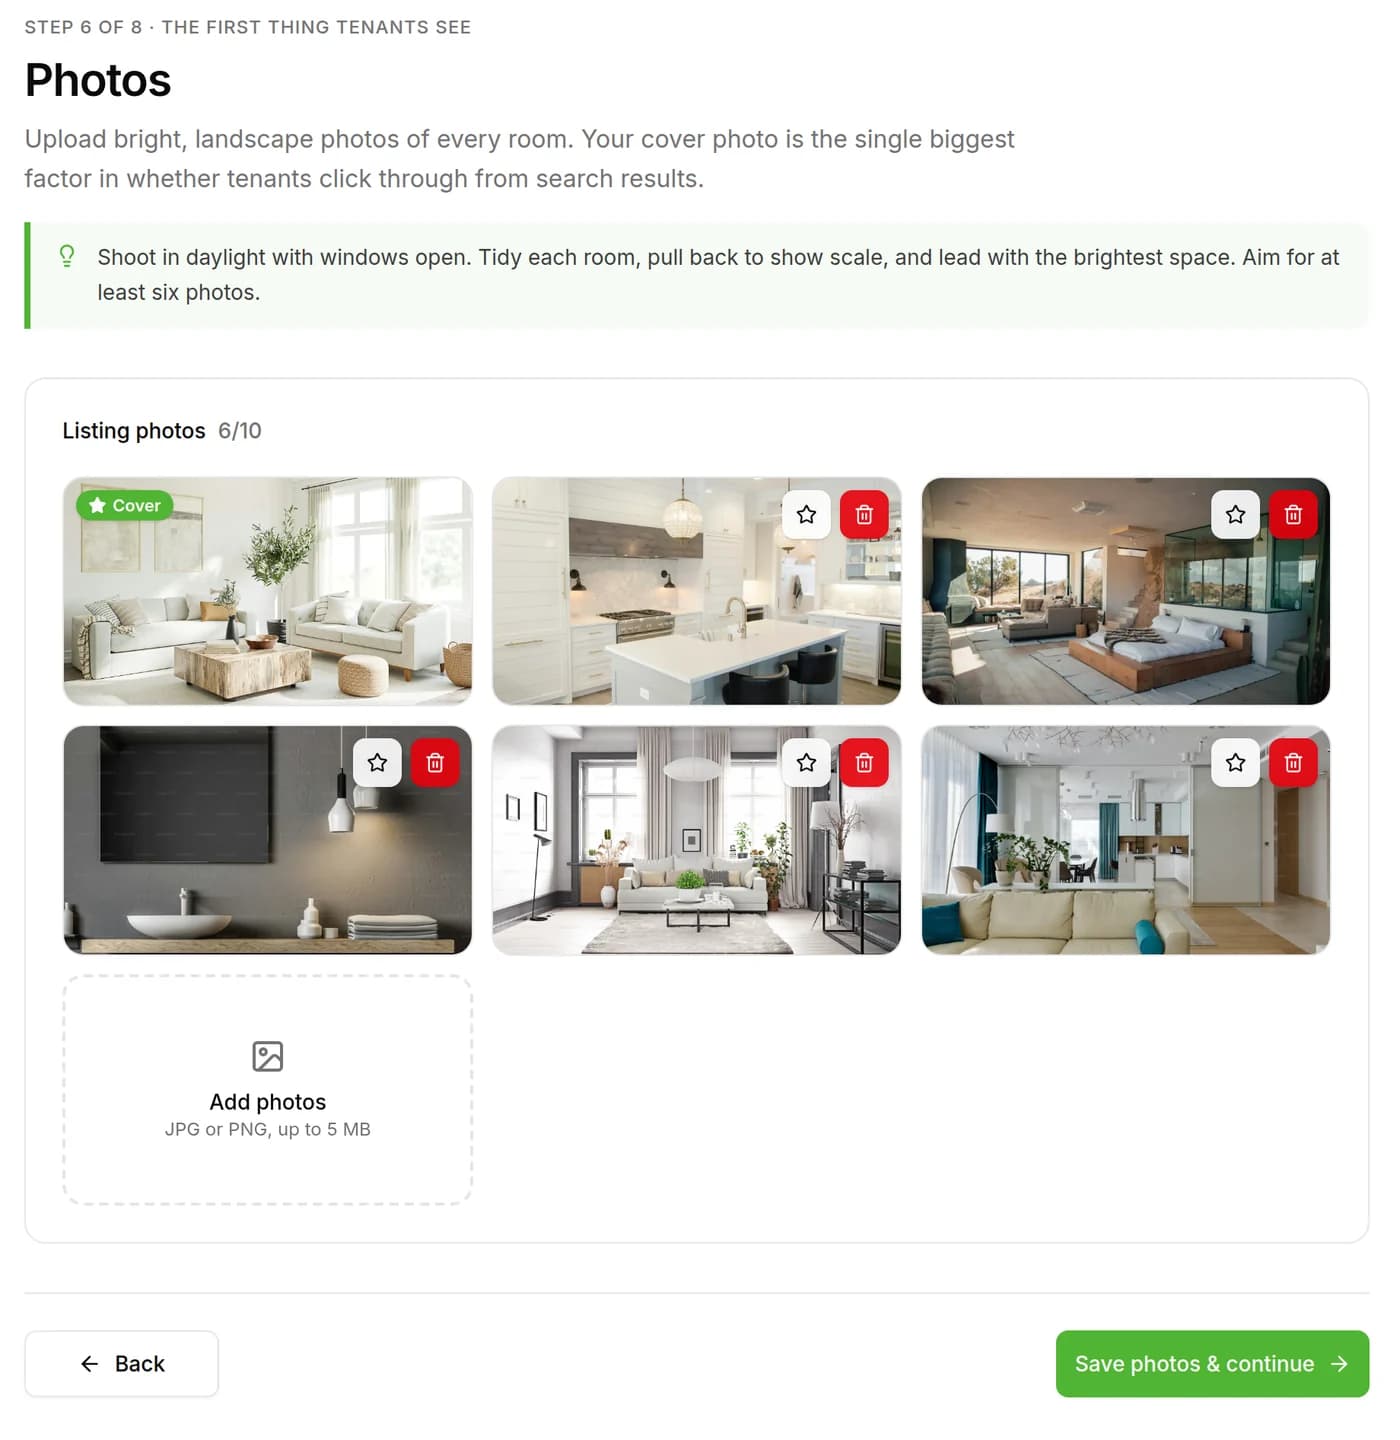
- 1Listing photos shows how many you have added out of a maximum of 10.
- 2The first photo is marked Cover. This is the image tenants see in search results, so make it your best and brightest room.
- 3Use the star on any other photo to make that one the cover instead. The red bin removes a photo.
- 4Add photos — JPG or PNG, up to 5 MB each. Aim for at least six: every room, shot in daylight, landscape.
- 5Save photos & continue.
Verv’s tip on this screen
“Shoot in daylight with windows open. Tidy each room, pull back to show scale, and lead with the brightest space. Aim for at least six photos.”
Step 7 of 8
Viewing availability
OptionalSet the days and times you are happy to host viewings, and tenants book themselves into the slots instead of ringing you.
Optional, but all-or-nothing: either leave the whole step blank, or fill in every field. Skip it and tenants reach you through Message Landlord instead, with the Book a Viewing button hidden on your listing.
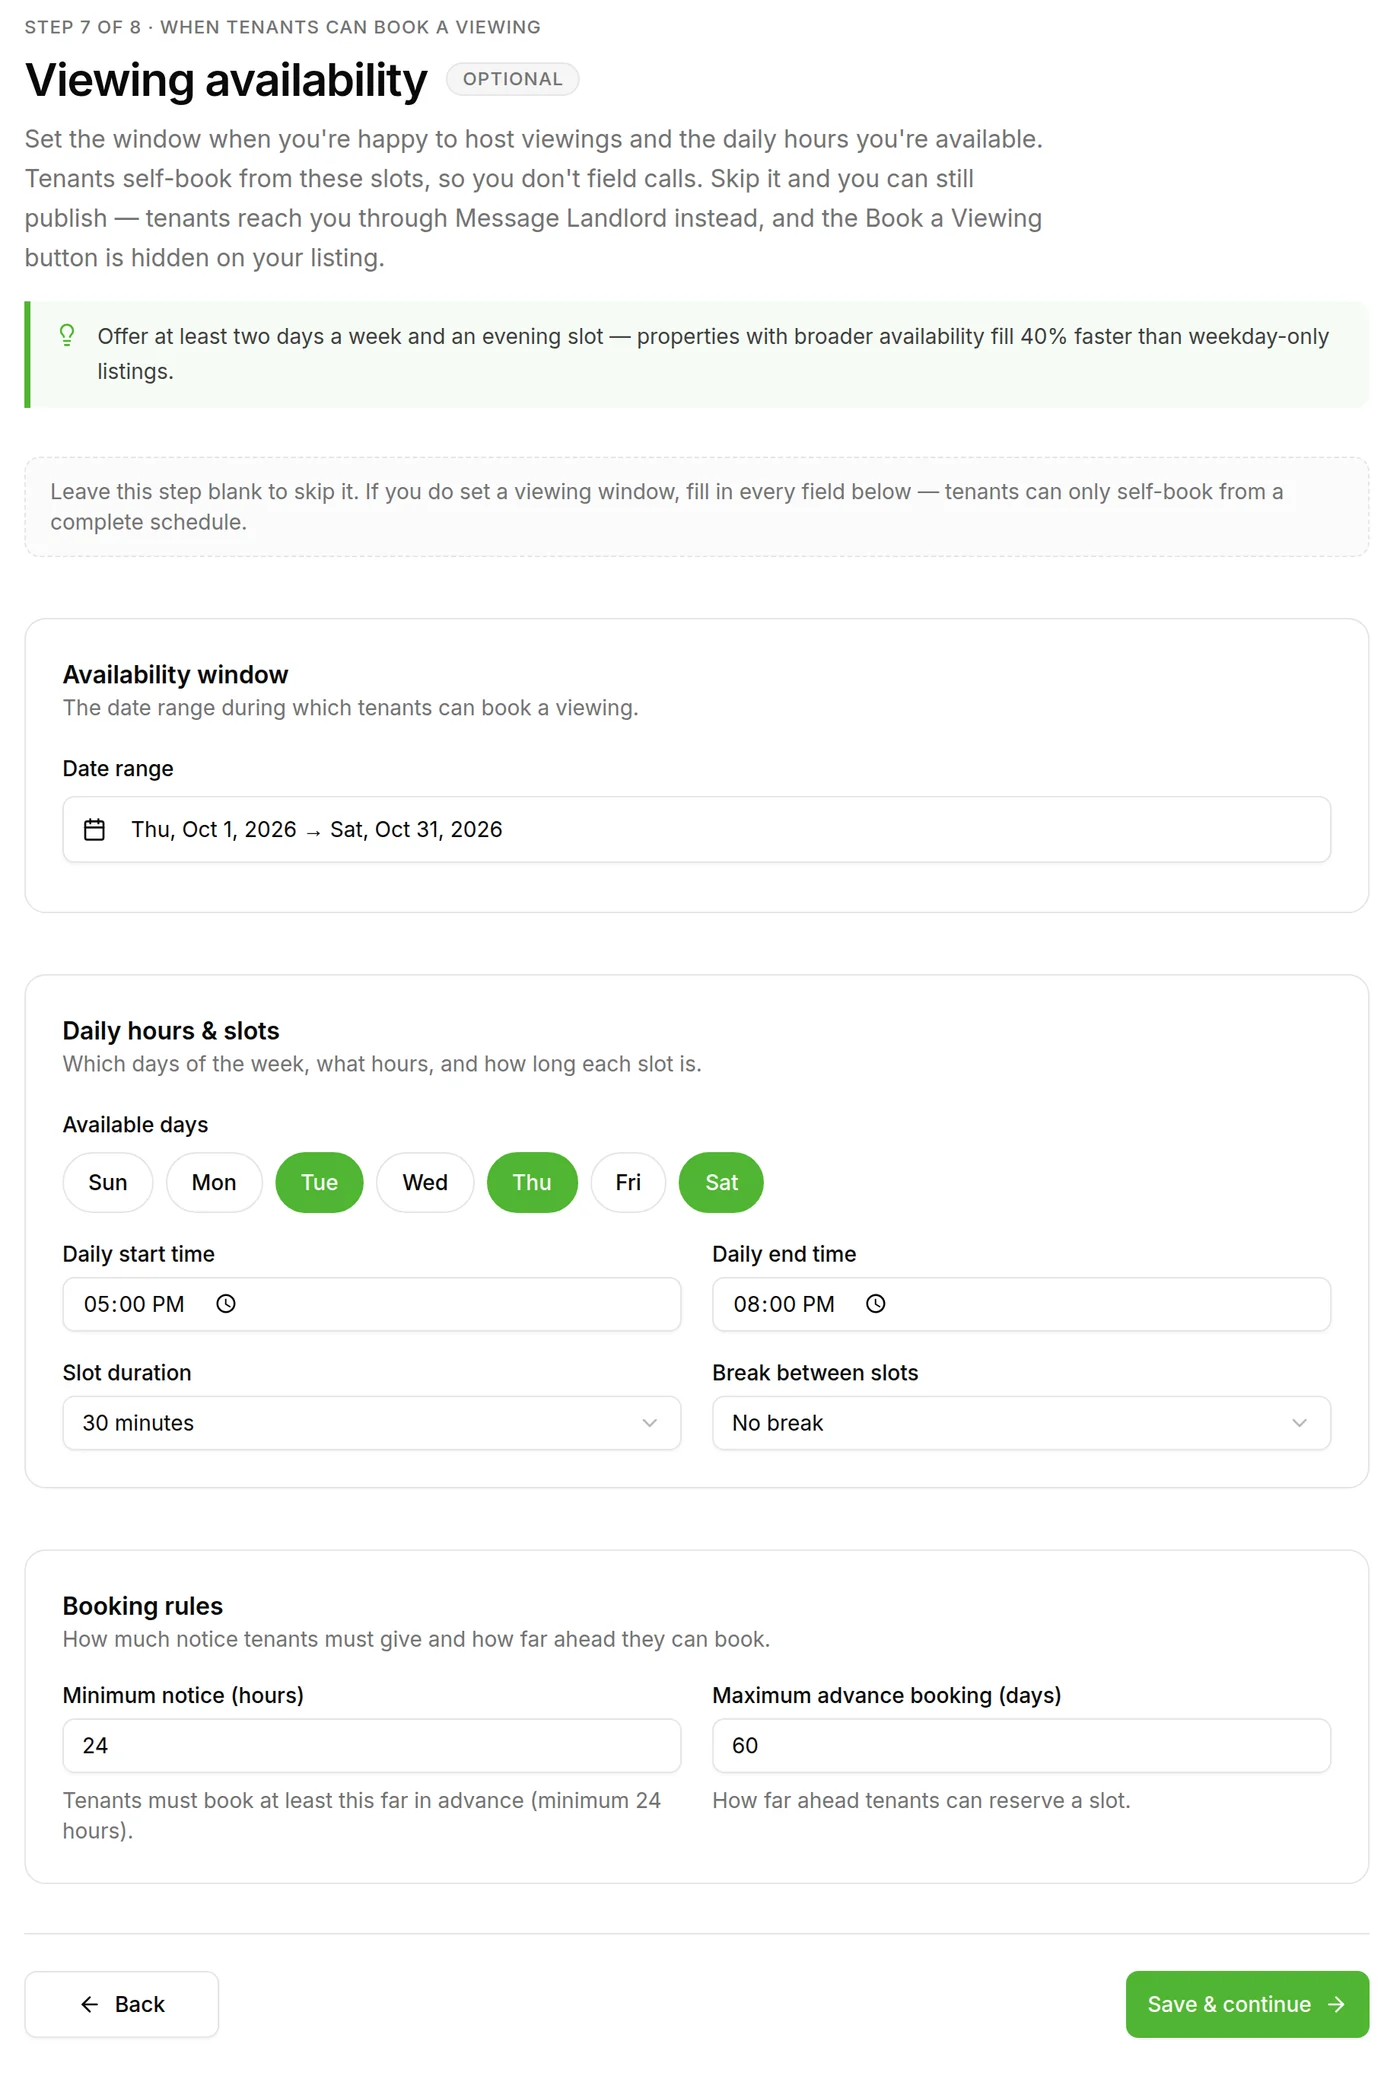
- 1Availability window. The date range tenants are allowed to book a viewing inside.
- 2Daily hours & slots. Choose the days of the week, then the daily start and end time, how long each slot is, and any break between slots.
- 3Booking rules. Minimum notice in hours (24 is the lowest allowed) and how many days ahead tenants can reserve a slot.
- 4This step is optional, but it is all-or-nothing: leave it completely blank to skip, or fill in every field. If you skip it, tenants contact you through Message Landlord and the Book a Viewing button is hidden on your listing.
- 5Save & continue.
Verv’s tip on this screen
“Offer at least two days a week and an evening slot — properties with broader availability fill 40% faster than weekday-only listings.”
Step 8 of 8
Compliance
An Energy Performance Certificate is a legal requirement before a property can be marketed to let in the UK, and the rating has to be shown to tenants.
Three ways to answer: you have a valid EPC, you want Verv to arrange one, or the property is exempt.
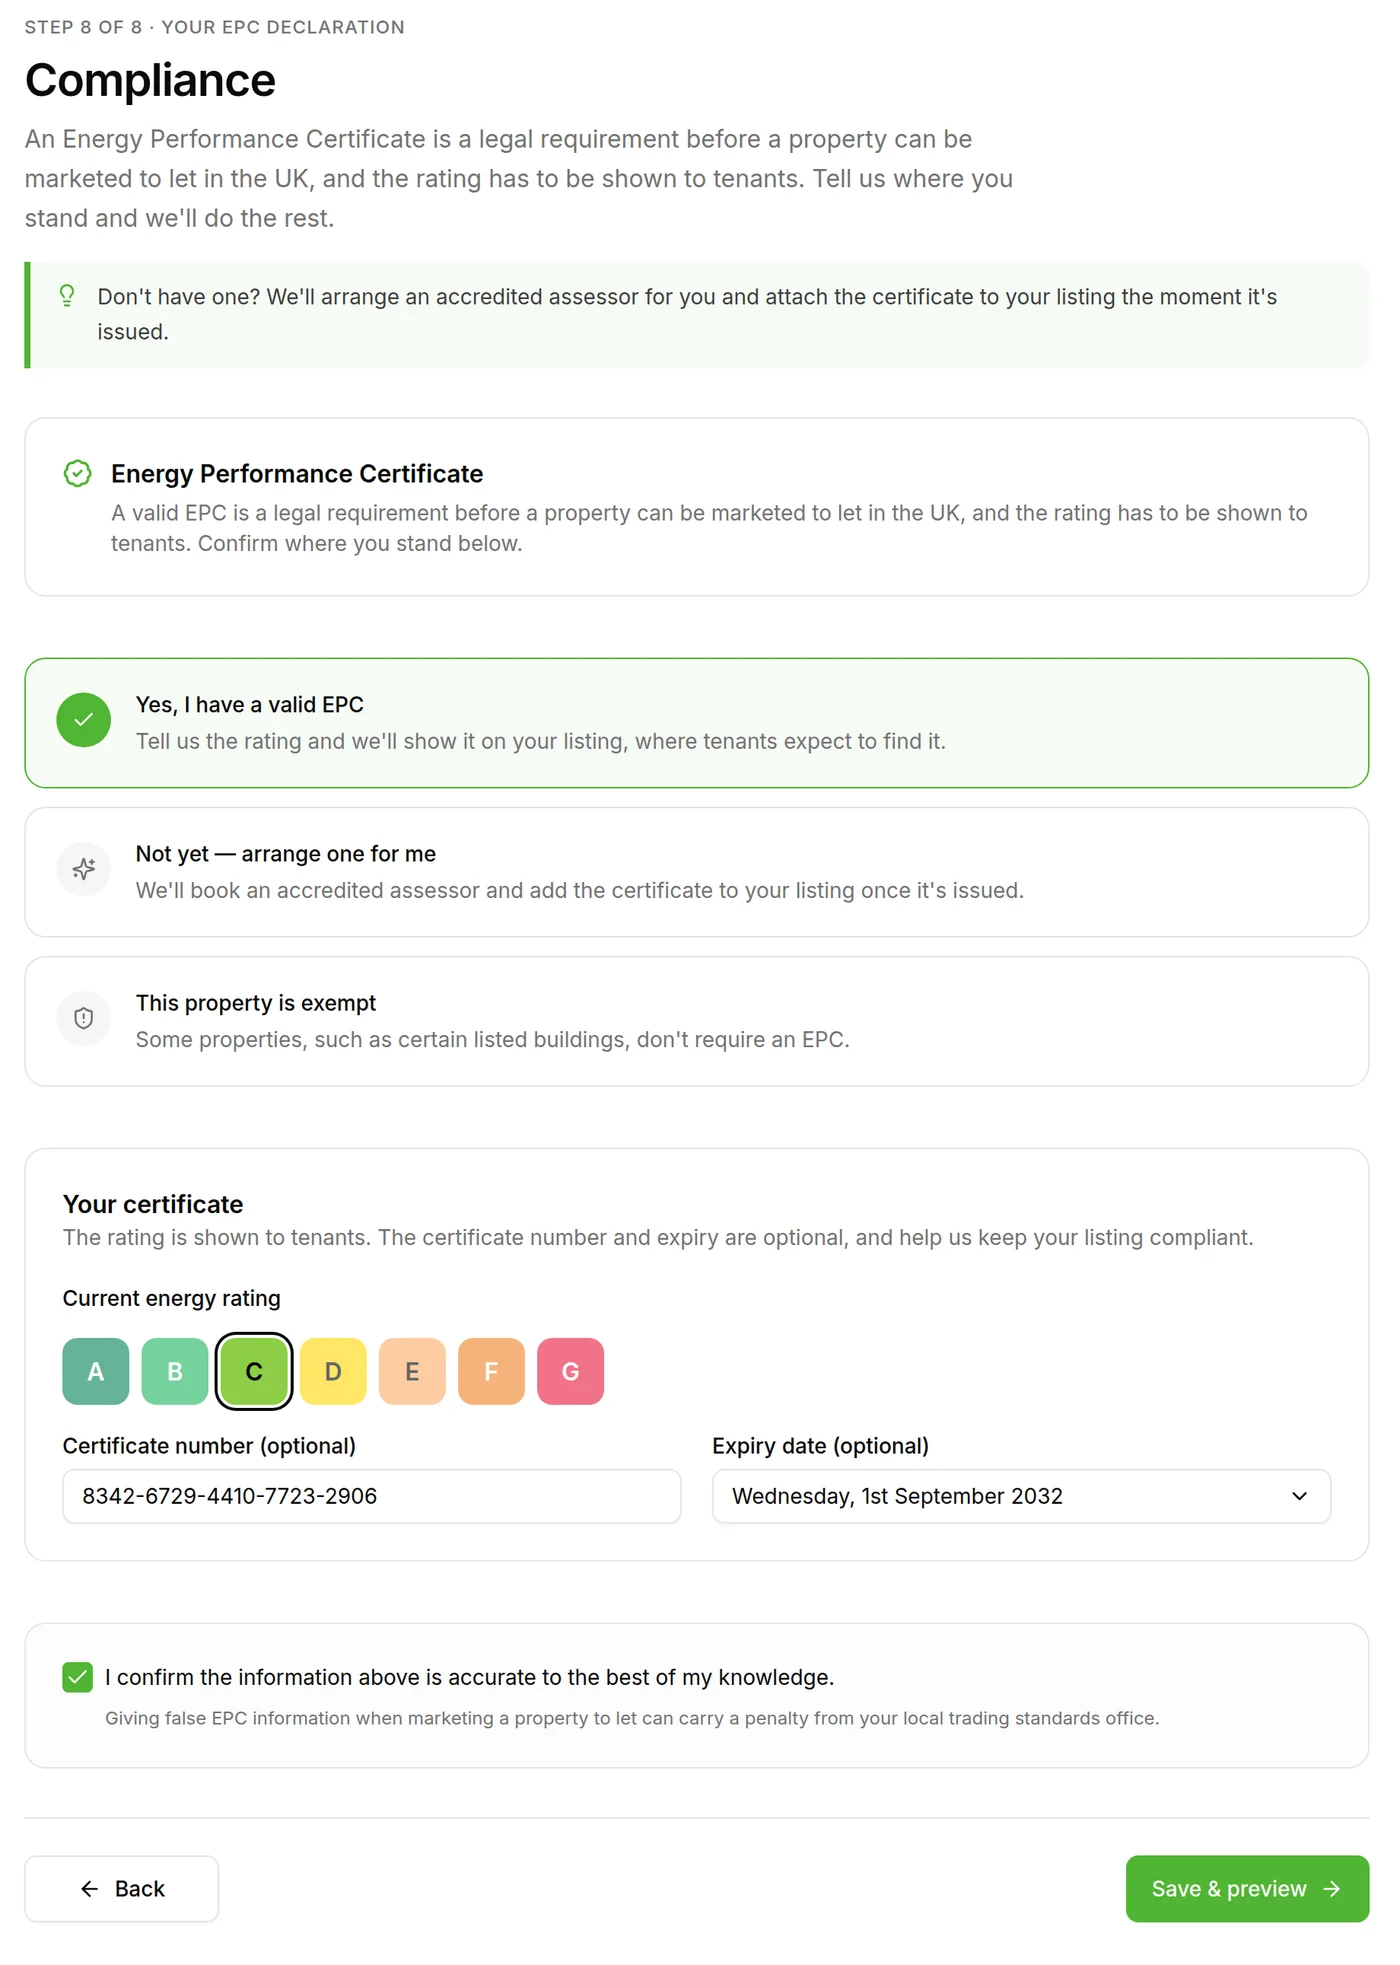
- 1Yes, I have a valid EPC — tell us the rating and it is shown on your listing.
- 2Not yet — arrange one for me. Verv books an accredited assessor and attaches the certificate to your listing once it is issued.
- 3This property is exempt — for the small number of properties, such as certain listed buildings, that do not require an EPC.
- 4Your certificate. Pick the current energy rating A–G. The certificate number and expiry date are optional.
- 5Tick to confirm the information is accurate. Giving false EPC information when marketing a property to let can carry a penalty from your local trading standards office.
- 6Save & preview takes you to the preview of your finished listing.
Verv’s tip on this screen
“Don't have one? We'll arrange an accredited assessor for you and attach the certificate to your listing the moment it's issued.”
Almost there
Preview your listing
Before anything is published you see your listing exactly as a tenant will. Read it as though you were looking for a flat.
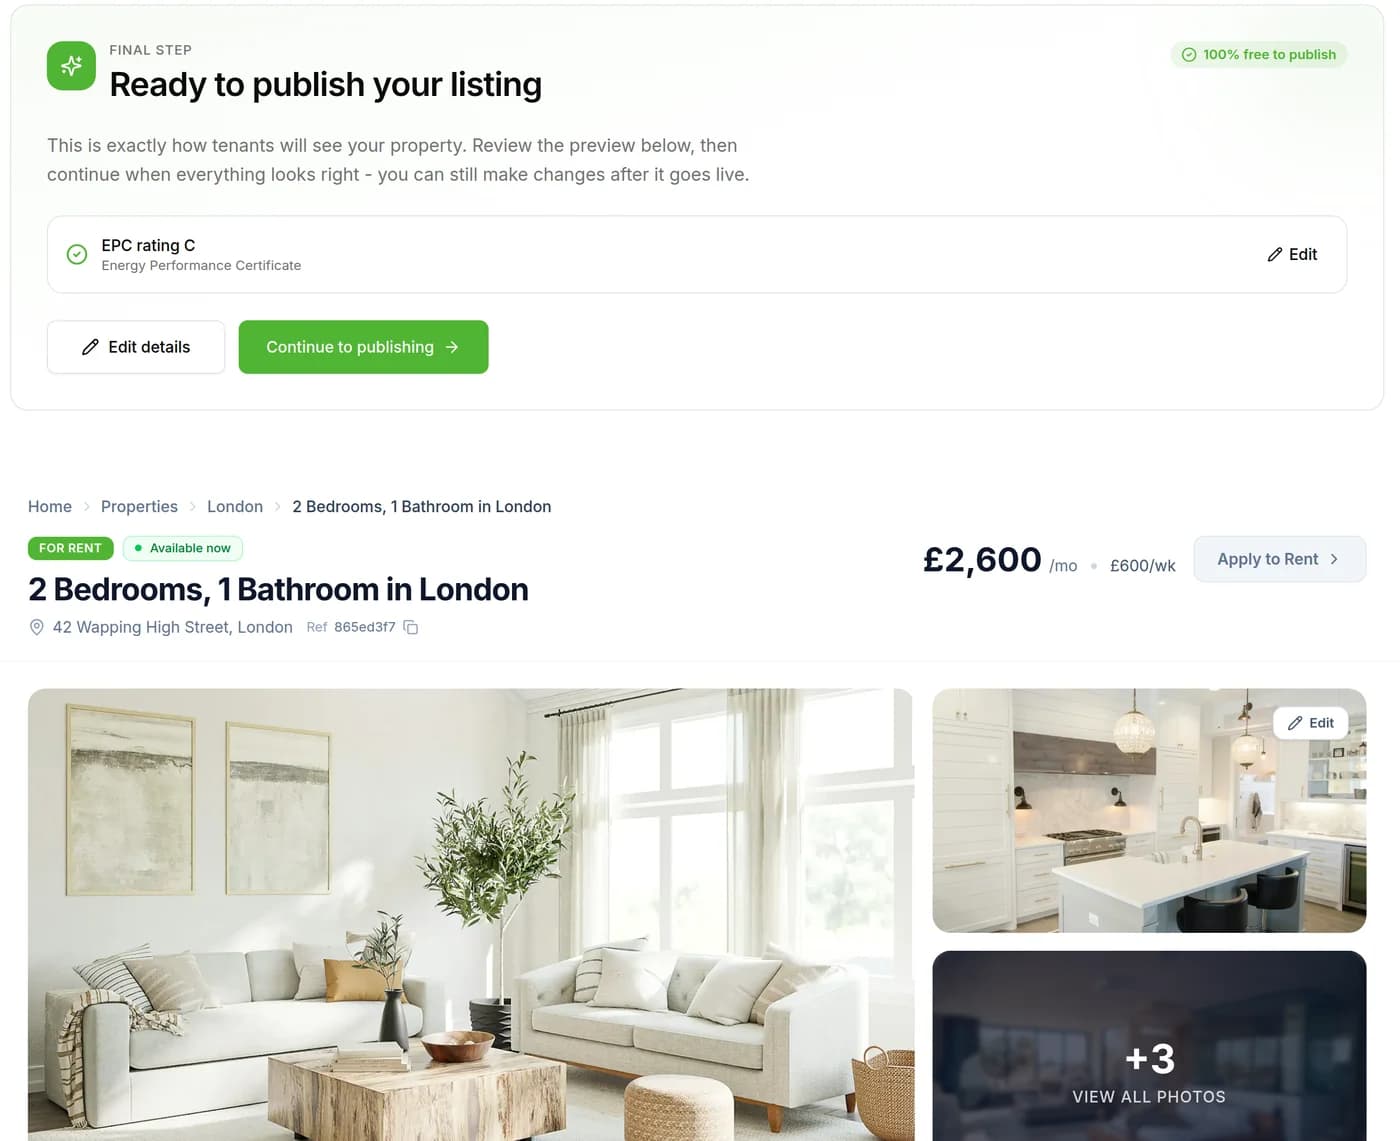
- 1Your EPC rating is carried through from Step 8. Edit on the right takes you back to that step.
- 2Edit details reopens the form if you want to change anything before publishing.
- 3Continue to publishing moves you on to choosing a plan.
- 4From here down is the tenant's view of your listing: the headline, the address, the rent per month and per week.
- 5Your photos, with the cover image leading. Everything here can still be changed after the listing goes live.
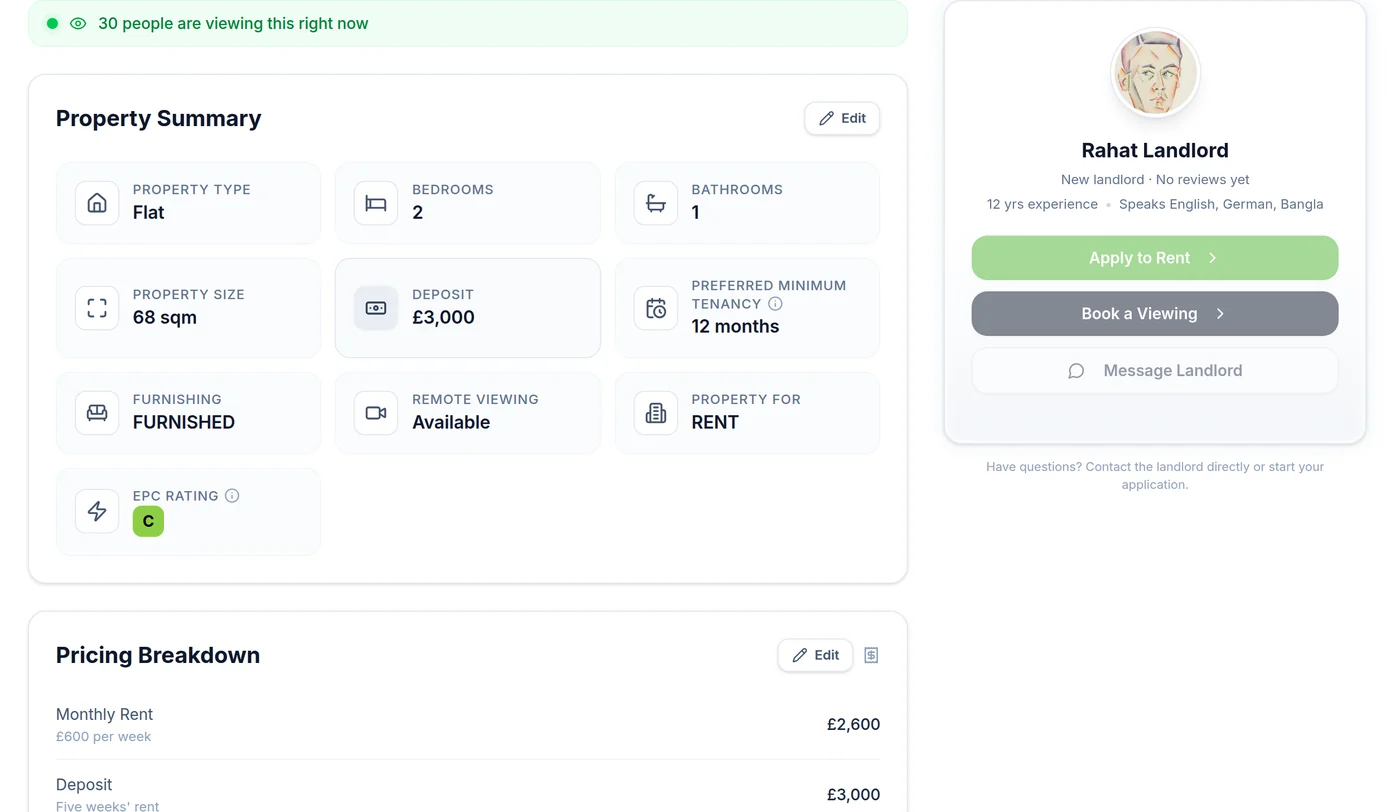
- 1Property Summary — the tiles tenants scan first. Check every one against what you entered.
- 2Each section has its own Edit button, so you can fix one detail without walking back through the whole form.
- 3Pricing Breakdown — monthly rent, the weekly equivalent, the deposit and whether bills are included.
- 4This is the panel tenants use to apply or book a viewing. The buttons are inactive while you are previewing.
Publishing
Pick a plan
Choose how much reach you want. Basic Listing is free for three months and is selected for you — nothing is charged until you publish.
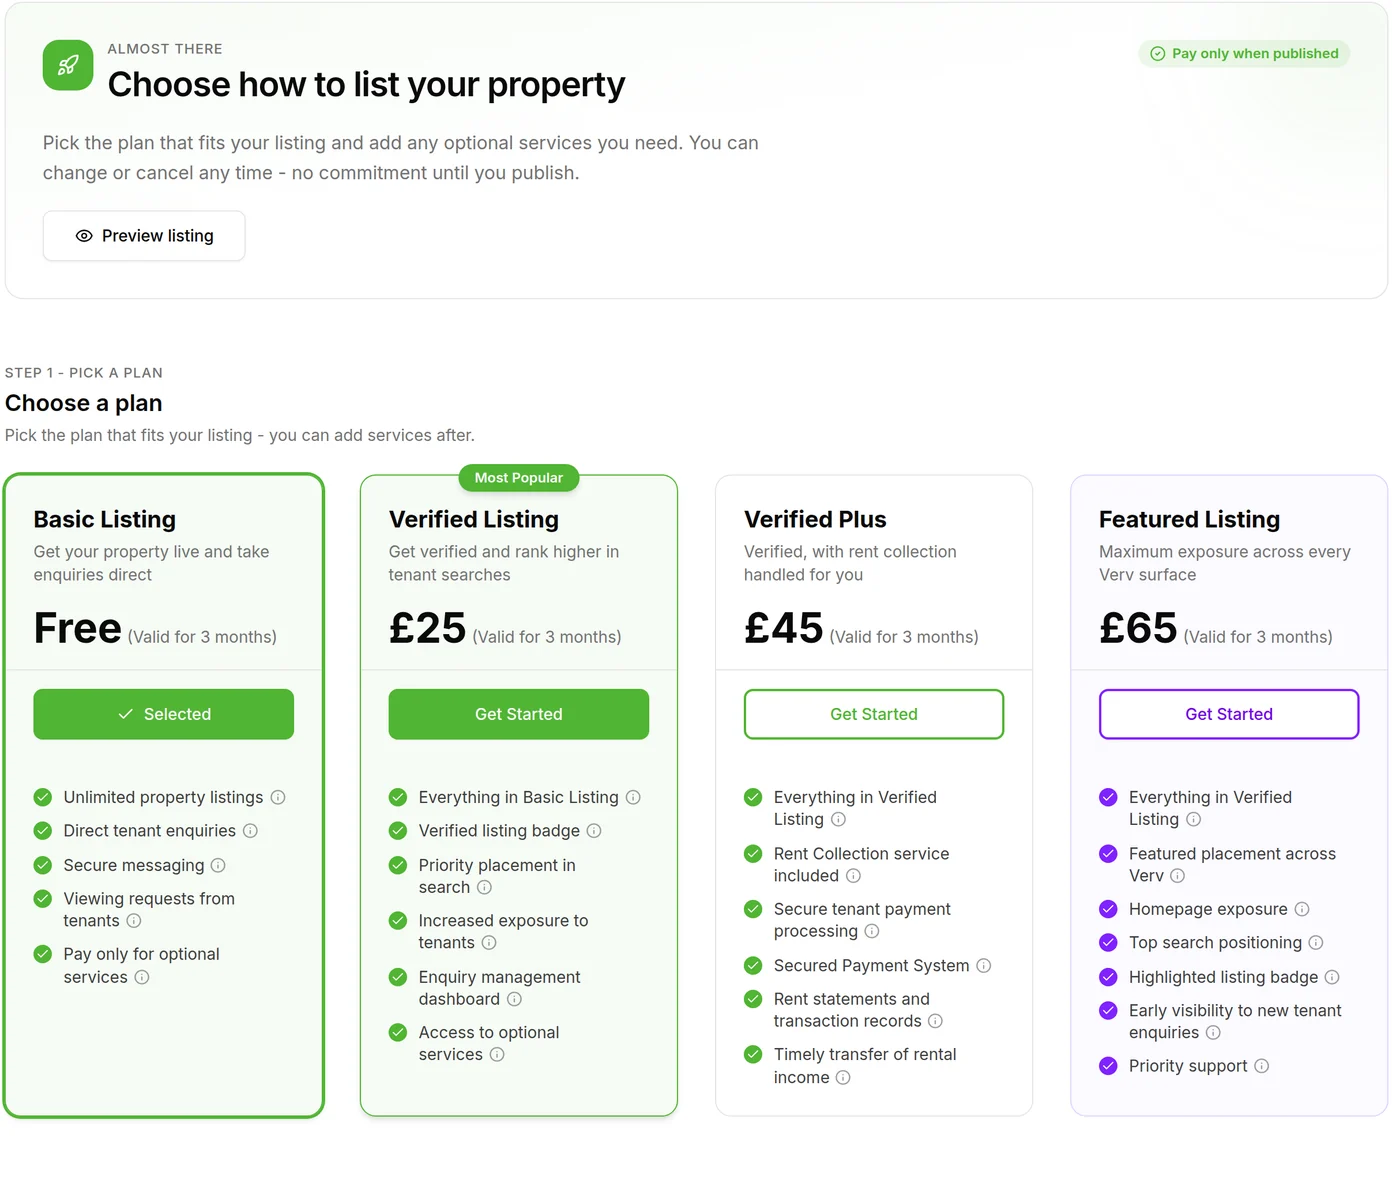
- 1Preview listing opens the tenant view again if you want one more look.
- 2Basic Listing is free for 3 months and is already selected. It gets your property live and takes enquiries directly — you only pay for optional services.
- 3The paid plans add verification, priority placement in search, rent collection and featured exposure. Prices shown are for 3 months.
- 4Nothing is charged until you publish — the banner at the top says Pay only when published.
Publishing
Add services
OptionalCertificates, inspections, photography, accompanied viewings and rent collection can be bought alongside your plan. None of them are needed to go live, and you can add them later.
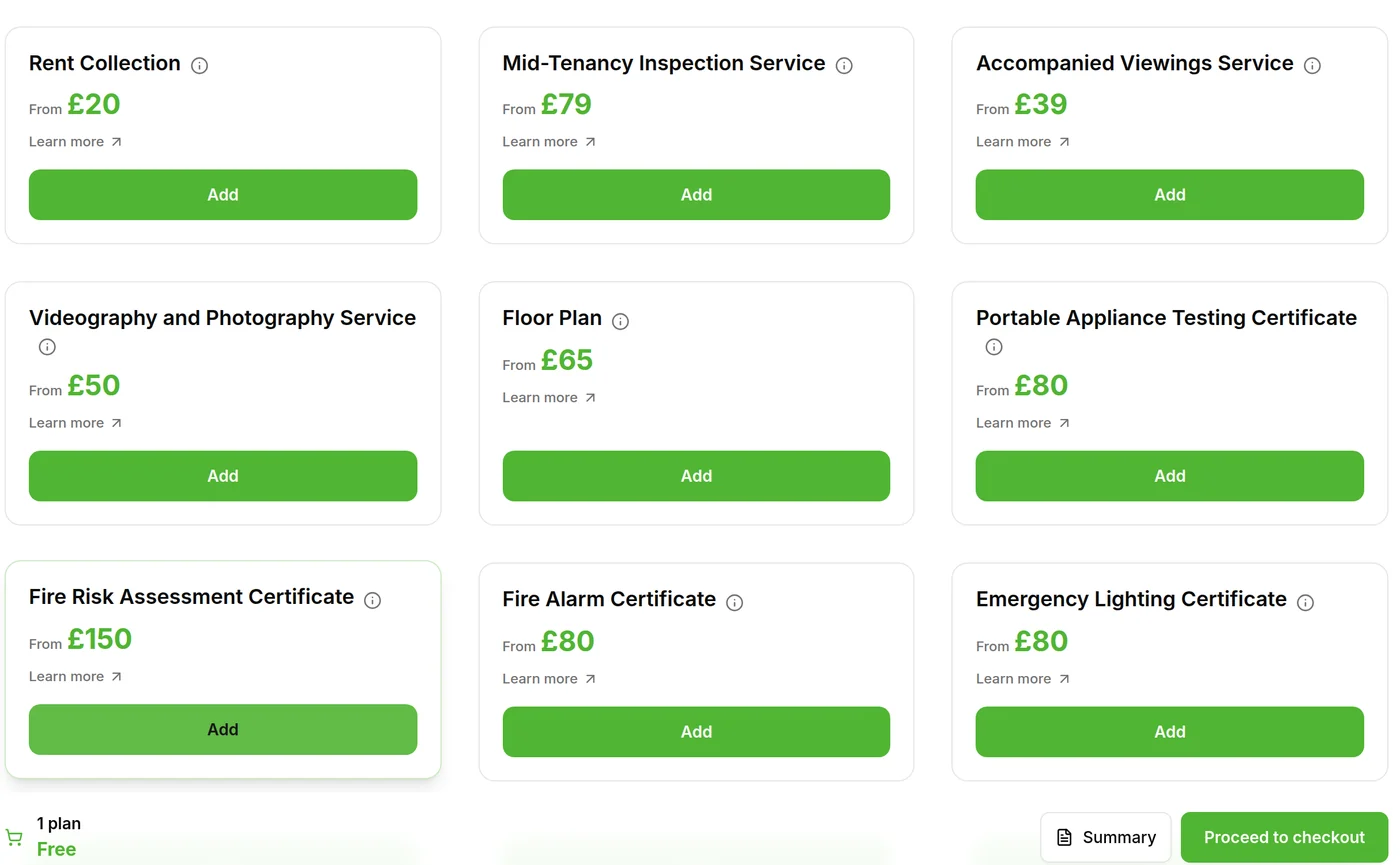
- 1Optional add-ons: rent collection, inspections, accompanied viewings, photography, and the safety certificates. None of these are required to publish.
- 2Learn more opens the detail for that service. Add puts it in your order.
- 3Prices are a starting point — each one reads From £….
- 4A bar pinned to the bottom of the screen keeps a running total. Proceed to checkout when you are ready.
Publishing
Confirm and publish
The last screen. Check the order, agree to the terms, and your listing goes live.
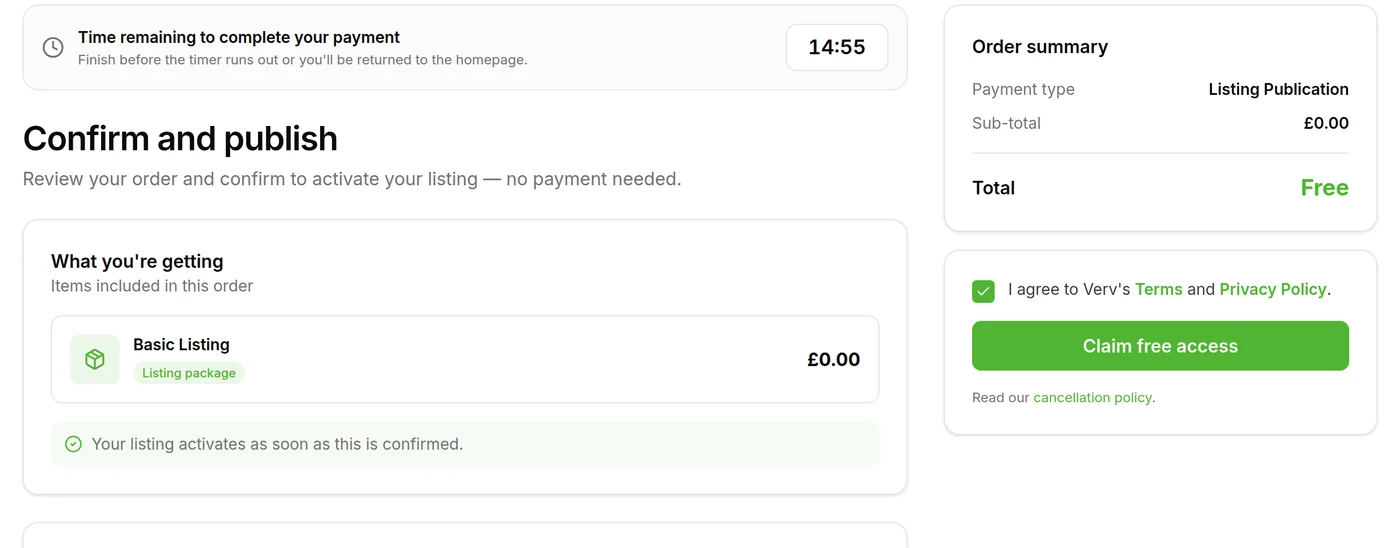
- 1You have 15 minutes to finish. If the timer runs out you are returned to the homepage and nothing is charged.
- 2What you're getting — your plan and any services you added.
- 3Order summary — the total. On the Basic Listing plan this reads Free.
- 4Tick to agree to Verv's Terms and Privacy Policy, then confirm. On the free plan the button reads Claim free access and no card details are needed.
After publishing
Managing your listing
Your property appears under Properties in the landlord menu, with a Published badge. Everything stays editable.
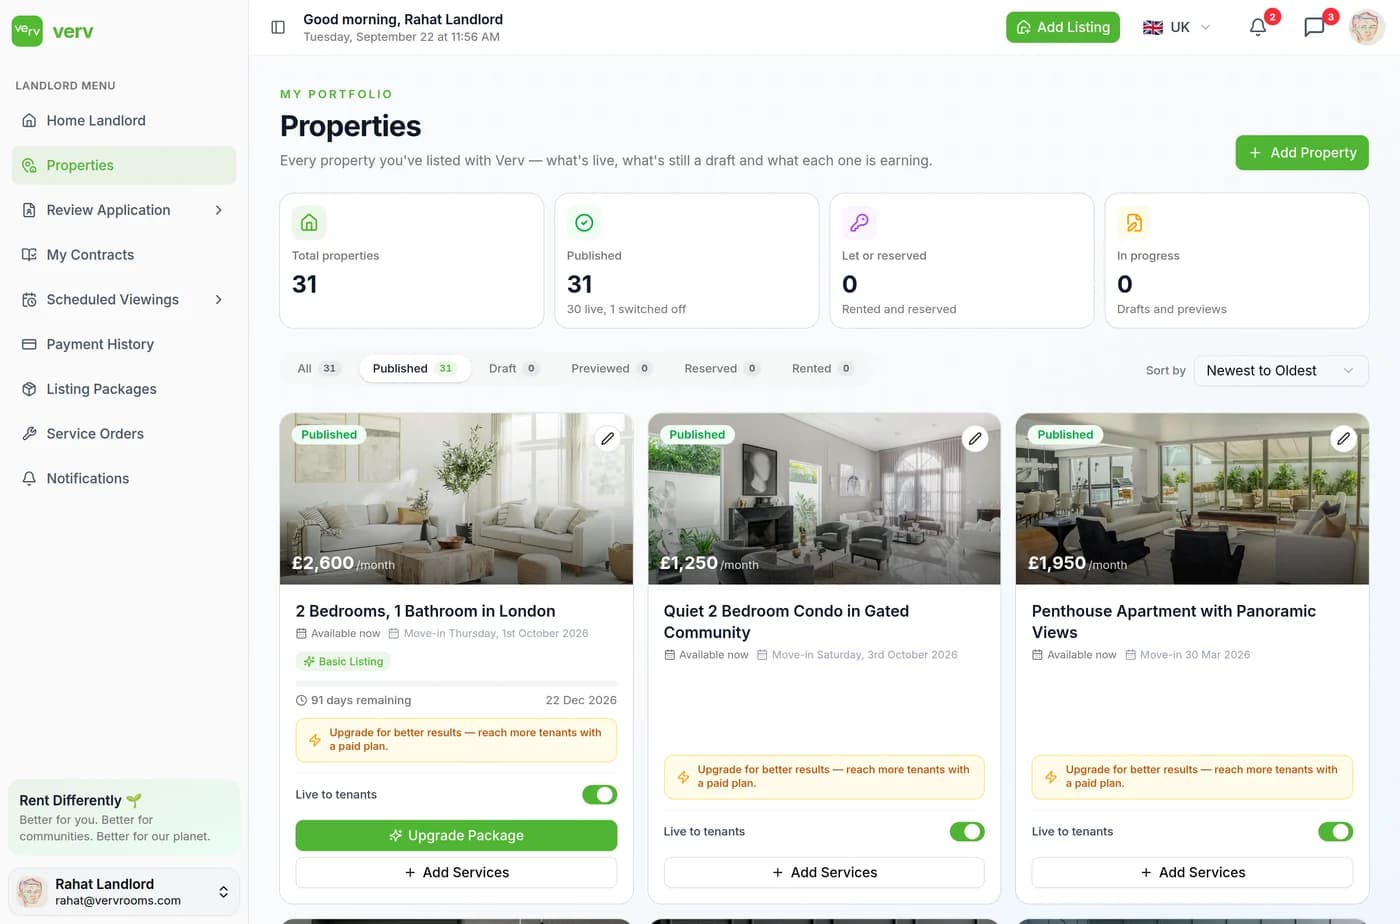
- 1Properties in the landlord menu is where every listing you own lives.
- 2The counters show how many are published, let or reserved, and still in progress.
- 3A Published badge on the card, and the Live to tenants switch to take it off the market without deleting it.
- 4The pencil reopens the listing so you can edit any step.
- 5Upgrade Package and + Add Services — you can change plan or add services at any time after publishing.
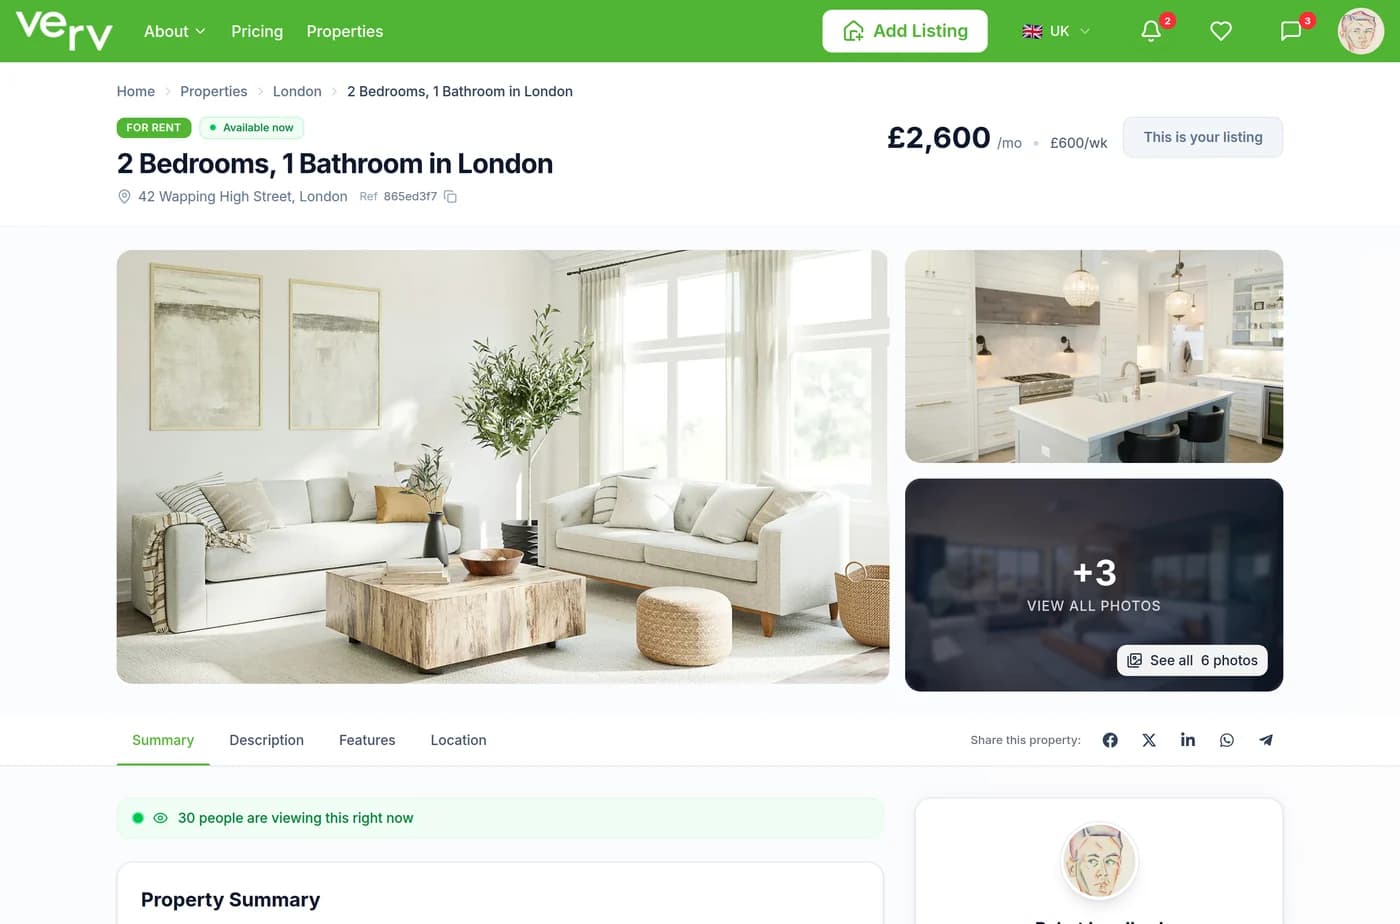
- 1This is your listing replaces the Apply to Rent button when you are viewing your own property.
- 2The headline, address and reference tenants quote when they contact you.
- 3Your photos. See all opens the full gallery.
- 4Tenants move between Summary, Description, Features and Location from here, and share the listing from the right.

That is the whole flow. Nothing is charged until you publish, and every step stays editable afterwards.